2 Aseptic Technique
Microbes exist ubiquitously in all types of environments: ponds, ocean, soil, air, and they are even in and on humans. Some types of microbes, called Archaea, thrive in extreme environments such as hot springs, volcanoes, and in the bottom of the ocean in white smoker hydrothermal vents. Microbes are on objects that you are in contact with in daily life. In all of these environments, it is not one microbe but several to hundreds living together. But, when we study microbial species in the lab, we rely on pure culture to understand the biology of the organism. Pure culture is created by inoculating media with a single strain with negligible genetic diversity. If a mixed culture (more than one bacterial species in one medium) or contamination occurs, you would not know which bacterial cell is doing what metabolically.
In order to work with pure culture in scientific labs, aseptic technique, or sterile technique, is used for various procedures such as transferring microbes (this is also known as inoculation), isolation of pure culture, and for performing metabolic tests. The principle is to prevent contamination as you work with microbes: before, during, and after. There are steps to ensure not to introduce microbes from the work area, the tools that you use, and the surrounding air into the culture of bacteria that you are using, and steps to ensure that you do not leave any microbes when you are finished.
You will be provided with pure cultures of bacteria and want to avoid any contamination. Possible contaminants can be from the lab bench, the air, the inoculating loop, and even yourself. Keeping bacterial cultures pure is key because this allows for the strain to be properly characterized.
MATERIALS
Each student should have:
Blue rack
2 sterile TSA slant (Trypticase Soy Agar)
2 sterile TSB tube (Trypticase Soy Broth)
3 test tube labels
Inoculating loop
Bunsen Burner
Striker
1 culture of Escherichia coli
1 culture of Staphylococcus epidermidis
PROCEDURE
GENERAL INFORMATION:
- Ethanol the lab bench prior to and after any laboratory work.
- Always carry the blue rack to collect your culture tubes and any other tubes. Caps are not sealed on. They can easily slide off. Always carry the tubes by the glass portion and not the caps.
- How to use the Bunsen Burner:
- Attach the rubber hose of the Bunsen Burner to the gas jet, and then turn the handle in-line with the hose and jet. This is the “on” position.
- Use the striker to light the Bunsen Burner.
- Adjust the Bunsen Burner flame by altering the horizontal knob at the base of the burner until you see an inner and outer blue flame. The hottest part of the flame is the topmost section of the inner flame. This is where inoculating loops and needles should be sterilized. (Figure 2.1)
- Bunsen Burners must be TURNED OFF WHEN NOT IN USE.
- When finished using the Bunsen Burner for the day, turn off the gas, and make sure ALL FOUR gas jets handles are turned in the same direction to prevent any gas leaks.
- Do not place any test tube cap down on the lab bench or the blue rack. Putting it down raises the chance for contamination.
|
|
|
|
Figure 2.1 Adjust the Bunsen Burner until there is an inner and outer blue flame. At the top of the inner blue flame is the hottest portion of the flame which is to be used to sterilize the inoculating loop and needle |
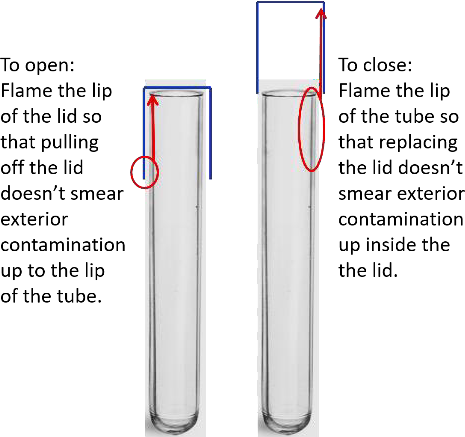
Figure 2.2 With repeated removal and replacement of the lid it is important to keep the part of the tube inside the lid sterile. An alternative method is to flame that entire part of the tube for opening and closing. |

HOW TO INOCULATE:
Slant to Broth: Performed with one Broth tube
- Before beginning, unscrew the slant but leave the cap loosely on the tube. This will make it easier during the transferring process.
- Flame the inoculating loop. (Slide the bright orange/yellow zone slowly along the wire.)
- Remove the cap from the slant of bacterial culture. Do not set the lid down. Hold it with the hand that is holding the loop (in hook of your little finger).
- Insert the inoculating loop into the bacterial culture slant, and carefully collect a loop of bacterial culture from the surface of the slant agar.
- Flame the opening of the tube and recap the tube. (Keep an eye on the loop with the bacteria.)
- Now flame and remove the cap from the sterile broth. Do not set the cap down.
- Insert the loopful of bacteria into the sterile broth.
- Remove the inoculating loop, flame the opening of the tube, and recap the tube.
- Flame the inoculating loop to sterilize it before you set it down.
Slant to Slant: Performed with 2 Slants — one slant = E. coli; one slant = S. epidermidis
- Before beginning, unscrew the slant but leave the cap loosely on the tube. This will make it easier during the transferring process.
- Flame the inoculating loop.
- Remove the cap from the slant of bacterial culture. Do not set the lid down. Hold it with the hand that is holding the loop (in hook of your little finger).
- Insert the inoculating loop into the slant of bacterial culture, and carefully remove a loop of bacteria from the tube.
- Flame the opening of the tube and recap the tube.
- Flame the lip of the slant-tube lid.
- Now remove the loosened screw cap from the slant, by grasping with little finger and twisting the tube with the tube-hand. Do not set the lid down. (Hook it with the little finger.)
- Keep the tube tilted and insert the loopful of bacteria but travel along the top of the tube opposite of the agar until you reach the bottom of the slant (not the tube).
- Gently touch the loop onto the surface of the agar slant and move the loop slowly as you withdraw from the tube. Be careful not to gouge the agar.
- Flame the opening of the tube and recap the tube by screwing the cap back on.
- Flame the inoculating loop to sterilize it.
Control: Performed with a Broth tube
The last sterile broth tube serves as a control for the aseptic technique. You are testing to see if you are flaming the inoculating loop efficiently. There is no bacterial culture use for this tube.
- Flame the inoculating loop.
- Remove the cap from the sterile tube and flame the opening of the tube.
- Insert the inoculating loop into the sterile tube.
- Remove inoculating loop from the tube.
- Flame the opening of the tube and recap the tube.
- Flame the inoculating loop to sterilize it.
Store all tubes in the red racks in your lab section’s bench area at room temperature.
REFERENCES
Brown, A. E. (2009). Benson’s Microbiological Applications: Laboratory Manual in General Microbiology. New York: McGraw Hill.
Chess, B. (2015). Laboratory Applications in Microbiology: A Case Study Approach. New York: McGraw Hill.
