6 Gram Stain
Differential staining techniques provide additional information on bacterial strains that a simple stain cannot. Differential staining uses two stains sequentially. A standard process uses primary stain, mordant, decolorizer, and counterstain. The mordant helps ensure that the primary stain remains bound to the positive bacteria. The decolorizer removes the primary stain from the negative bacteria. Differential staining distinguishes bacteria according to whether they can retain the first, or primary stain during the decolorization stage. This is informative because the ability to retain the primary stain is based on structural differences. The result for a bacterial strain may be positive for cells retaining the primary stain. Or the result may be negative for cells that lose the primary stain and are visible only with the secondary or counterstain.
The most important, and most widely used, differential stain is the Gram stain. With a few exceptions, the most bacteria are divided into the categories Gram positive or Gram negative. This staining technique was developed by the physician Hans Christian Gram in 1884 while working with infected lung tissue.
The structure of the cell envelope of the bacterial cell is what determines whether the bacteria cell is gram positive or gram negative. The major component is the thickness of the peptidoglycan in the cell wall. Gram positive bacteria have a thicker layer whereas Gram negative bacteria have a much thinner layer of the peptidoglycan. (Figure 6.1) The large number of layers of peptidoglycan in a Gram-positive cell wall are permeable because of water between the layers. The ethanol used for decolorization draws the water out, trapping the stain. Gram positives also have teichoic and lipoteichoic acids in the cell wall, which stabilizes the primary stain with the mordant. This tight cell wall in the presence of the decolorizer causes the primary stain to remain. The outer membrane also plays a role in gram negative bacteria. This covers the thinner layer of peptidoglycan. It is made up of lipids, lipopolysaccharides and lipoproteins. During the decolorization step, the ethanol solubilizes these hydrophobic compounds and the bacteria to become more porous. This allows the primary stain to leach from gram negative bacteria, and they become transparent. The counterstain makes them visible.
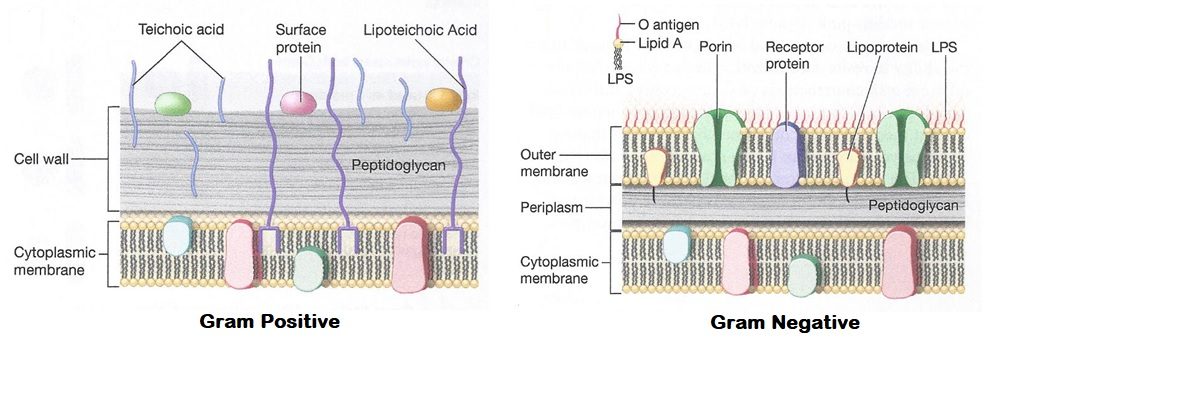
Figure 6.1 The difference between cell envelope structure of Gram positive and Gram negative bacteria. Image from https://laboratoryinfo.com/gram-staining-principle-procedure-interpretation-and-animation/
MATERIALS
Each student should have:
Blue rack
2 glass slides
Stain bottle rack: crystal violet, Gram’s iodine, 95% ethanol, and safranin
Lens paper
Windex (depends on instructor)
Inoculating loop
Wax pencil
Metal slide clip
Bunsen Burner and Striker
1 culture of Escherichia coli
1 culture of Staphylococcusepidermidis
Microscope
PROCEDURE OF SMEAR PREPARATION
MAKE 2 SMEAR PREPS. ONE WILL BE USED AS A BACKUP.
- Draw a circle with the wax pencil on a slide.
- Flip the slide over. Write “Up”.
- Add one drop of distilled water within the target circle.
- Using aseptic technique, transfer one loopful of each bacterial species onto a single location on the slide, mix and spread the 2 species of bacteria within the wax circle.
- Air dry the slide. Do not apply heat to a wet slide. Do not blow on the slide.
- Heat fix the slide.
PROCEDURE OF GRAM STAIN
STAIN ONLY ONE SLIDE. You may not need the second slide. This serves as a backup in case you have error in your staining procedure. It saves you time.
- Place one smear prep on a stain tray.
- Stain slide with the primary stain crystal violet for 60 seconds.
- Rinse slide with distilled water until clear.
- Add the mordant Gram’s iodine onto the slide for 60 seconds.
- Decolorize with 95% ethanol for 8-12 seconds.
- Stop decolorization by rinsing with distilled water.
- Counterstain by adding safranin to the slide for 60 seconds.
- Rinse with distilled water.
- Blot dry with a paper towel.
- Examine under the microscope, and show your instructor at 1000x magnification.
- After your instructor’s approval of your staining technique, dispose of your slides in the plastic beaker labeled “Self prepped” in the Discard Area.
REFERENCES
Brown, A. E. (2009). Benson’s Microbiological Applications: Laboratory Manual in General Microbiology. New York: McGraw Hill.
Chess, B. (2015). Laboratory Applications in Microbiology: A Case Study Approach. New York: McGraw Hill.
Cowan, M. K. (2015). Microbiology: A Systems Approach (4th edition). New York: McGraw Hill.
Pommerville, J. (2007). The Gram Stain Technique. In J. Pommerville, Alcamo’s Laboratory Fundamentals of Microbiology (p 49). Boston: Jones & Bartlett, LLC. Retrieved from https://books.google.com/books?id=3bk2z_Du5ZQC&printsec=frontcover#v=onepage&q&f=false
