1 Microscopy
A basic definition of a microorganism is a living organism that cannot be seen with the naked eye but can be seen through a microscope. Microorganisms include bacteria, viruses, protists (algae and protozoa), fungus, and even some helminths. In this course, microscopes will be used primarily to view bacteria. Microorganisms are everywhere, and can be considered the good, the bad, and the ugly. There are not many that fall into the category the bad.
There are different types of microscopes based on how the microscope produces the image. Some microscopes use light whereas others use a beam of electrons. Light microscopes can use visible light or fluorescent light. Which type of microscope that is used depends on the goal of the scientist. There are different types of light microscopes: brightfield, darkfield, and phase contrast. The students in this course will only be using brightfield, parfocal, compound microscopes.
CARE OF THE LIGHT MICROSCOPE
It is important to treat the microscopes with care with every use. This way each microscope is prepared and ready for the next user without the risk of damage.
Transport: The microscope should be carried with two hands. One hand should grasp the arm of the microscope while the other should be under the base for support.
Electric Cord: 1) The power cord unplugs from the back of the base of the scope. Make sure it is plugged in in order to have light. 2) Keep excess cord off the lab bench for safety. 3) When returning the microscope to the cabinet, hang the cord around the ocular lenses.
Lens Cleaning: Clean the ocular and objective lenses with lens paper. Not Kim wipes or paper towels. These items can scratch the lenses. Clean the lenses before viewing your specimen. The last thing you do before putting your microscope away is cleaning the lenses. Leaving oil on the objectives can limit the resolution thus making it unable to view bacterial specimens. Depending on your lab instructor, you may be instructed to use Windex. This helps cut the oil on the lenses and clean the lenses better. But it can leave residue on the lens if not completely remove with lens paper. The condenser lens may also need to be cleaned with lens paper due to too much oil being used.
COMPONENTS OF THE LIGHT MICROSCOPE
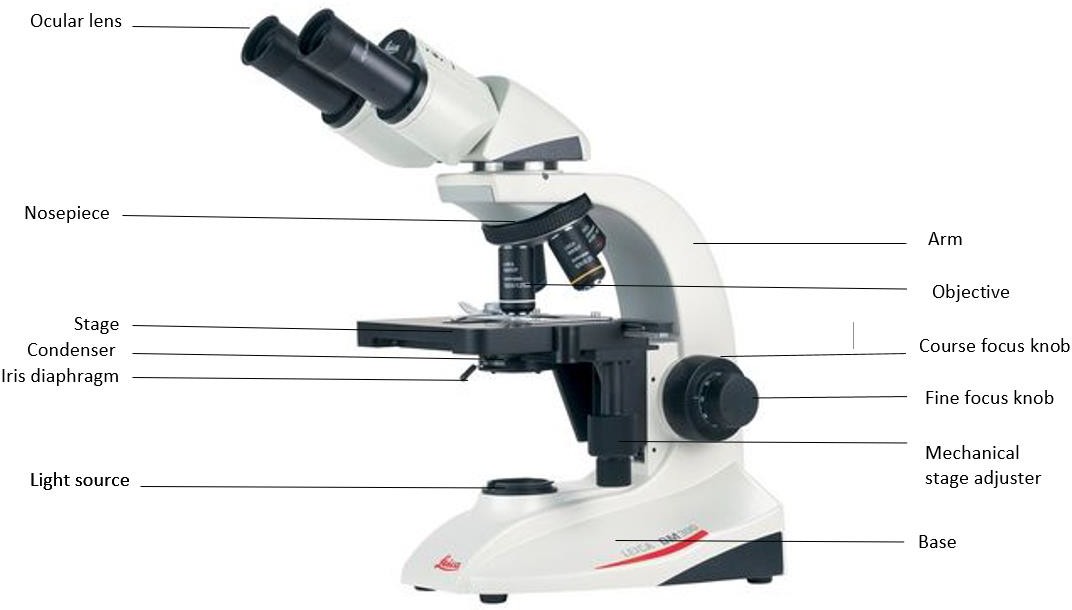
The following are the general parts and functions of the typical compound microscope (Figure 1.1):
Framework: This is the basic frame structure that consists of the arm and the base. All other parts are attached to this framework. The arm supports the tube that connects the eyepiece to the objective lenses. The base is the bottom of the microscope that supports the whole microscope.

Figure 1.1: Components of a typical compound microscope.
Stage: The flat platform that supports the microscope slides is the stage. Stage clips hold the slide so that the mechanical stage adjuster (which has two knobs) can move the slide. One knob moves the slide left and right and the other up and down.
Light source: A lamp is in the base of the microscope that serves the purpose of a light source to illuminate the specimen. The intensity of the light can be adjusted by rotating the knob/ wheel on the base. (The power switch for the light source is on the back on the scope at the base of the arm.)
Lens system: Compound microscopes are three lens systems: the oculars, the objectives, and the condenser. The ocular lenses, or eyepieces, are the lenses that are located at the top of the microscope closest to the eyes. They usually have a magnification of 10x, and most microscopes have two ocular lenses. This is known as binocular. The objective lenses are the lenses closest to the object which you are trying to view. In most microscopes, there are 4 objectives. The objectives are attached to the nosepiece in order to be able to change which objective you are using. Most commonly they have the magnification of 4x, 10x, 40x, and 100x, but we have some scopes that have 50x objectives. 4x is known as a scanning objective, 10x is a low power objective, 40x is a high dry objective, and 50x and 100x are both oil immersion objectives. The condenser lens is located under the stage. It collects and focuses the light from the light source through the slide being viewed. It does not have a magnifying power like the ocular and objective lenses. The condenser can be moved up and down by a knob, but its best position is just a below the highest point, a few mm below the slide. How much light the condenser transmits is controlled by the iris diaphragm. It is an adjustable disc with a hole in the center. This disc is within the condenser and controlled by a lever or knob outside of the condenser.
Focusing Knobs: There are two concentric focusing knobs on each side of the microscope: course adjustment knob and fine adjustment knob. The large outer knob is the course adjustment knob. It moves the stage up and down visibly, bringing the slide closer and farther from the objective. The smaller inner knob is the fine adjustment knob. The course adjustment knob is only used at the lowest magnification. The smaller inner knob is used to bring the specimen into sharp focus.
THEORY
There are two concepts of microscopy: magnification and resolution. Magnification is simply the ability to make small objects appear larger whereas resolution is the ability to distinguish two objects from each other. An easier definition of resolution would be the clarity of an image, or the ability to show detail.
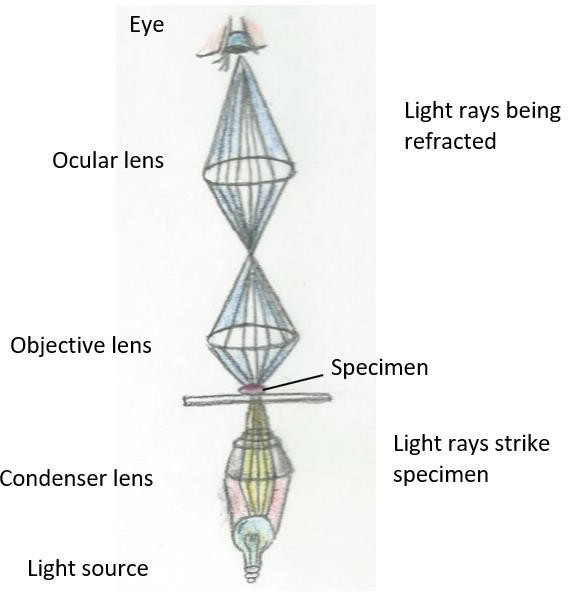
Let’s take a closer look into the concept of magnification. In a compound microscope, the pathway of light is through the three-lens system of the condenser, objective, and the ocular. The condenser focuses the light onto the specimen. The light refracts, or bends, as it passes through the objective and the ocular lenses. The brain interprets what the eye is seeing through the ocular lens. (Figure 1.2.) The objective and ocular lens each have differing magnifying power. The determination of the total magnification of the specimen is by multiplying the magnification of the ocular and the magnification of the objective being used.
|
Figure 1.2: This drawing shows how the condenser focuses the light onto the specimen. After which, light is refracted by the objective lens, increasing the magnification. From there, light is then refracted by the ocular lens, increasing the magnification of the specimen. Note: One effect of this arrangement is that the virtual image is effectively a meter or so from your eye. If you find yourself tiring your eyes, you may be trying to use your eye muscles to focus the image. The appropriate use of your eyes is to relax and look into the middle distance. Pretend you are watching TV and focus out past the microscope. |
|
As magnification increases, there is a greater need for higher resolution, making a sharper image. Two factors affect resolution: the wavelength of light and numerical aperture. The shorter wavelengths of light result in higher resolution. Numerical aperture is a property of a lens. It is the measure of the lens’s ability to gather light. The higher the numerical aperture of a lens, the higher resolution of a specimen with that lens. Now let’s tie those two factors mathematically together as resolving power, which measures the ability of a lens systems to resolve detail and is defined as the smallest distance between two points that can still be distinguished as two separate entities. The resolving power can be calculated with the following equation:
R = 0.61λ
NA
R = resolving power, λ = wavelength of light being used, and NA = numerical aperture of the objective being used
Numerical aperture is a number written on the objective next to the magnifying power. It can be 0.4 (low power) to 1.25 (oil immersion). All in all, for any brightfield light microscope, by using the above equation, the limit of resolution is about 0.2 µm. This means that 2 objects closer than 0.2 µm would not be seen as 2 different objects.
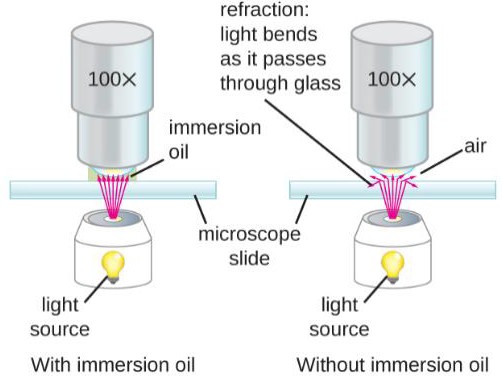
To improve resolution by maximizing the numerical aperture and reducing light refraction, the use of immersion oil is done on the 50x and 100x objectives. (Figure 1.3)
|
Figure 1.3: Immersion oil prevents the loss of light rays, which improves resolution. (Image from Openstax) |
|
DEMONSTRATION OF OTHER LIGHT MICROSCOPES
As previously stated, in this course, brightfield microscopes are going to be used. It allows light rays to pass directly to the eye without being deflected and transmitted through a specimen. In general, in order to view the specimen, a process called staining often needs to be done. It increases the contrast between the cell and its surroundings. However, a disadvantage is that staining results in cell death, which restricts the ability to observe living cells and their activities. You will be learning several staining techniques through the term.
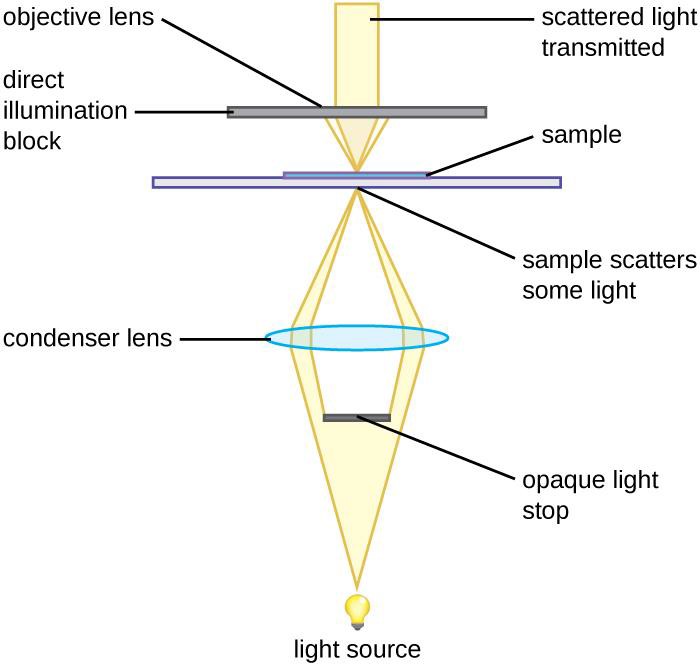
Other types of light microscopes are darkfield and phase contrast. To achieve the darkfield effect, special condenser is used that contains an opaque disk that allows only oblique rays to strike the specimen. The result is a brightly lit, transparent specimen against a black background (Figure 1.4 a). Phase contrast microscopes enhance the contrast between a cell and its surrounding by shifting the light that does not interact with the specimen down a ¼ wavelength. This is called a phase shift. (Figure 1.4 b). How this is done is by objective and condenser containing phase rings. The result is a darker background compared to the specimen. (Figure 1.4 c). Living cells can be seen in action in both darkfield and phase contrast microscopes.
There may be special microscopes available in the lab that can compare brightfield, darkfield, and phase contrast microscopy using a water sample.
|
|
|
|
(a) Darkfield microscopy |
(b) Phase contrast microscopy |
Figure 1.4: (a) This diagram depicts how the condenser in a darkfield microscopes has an opaque disk that only allows oblique light rays to strike the specimen, resulting in transparent, illuminated specimens. (b) The illustration shows how the annular ring below the condenser and the phase plate in the objective cause a phase shift of light. (c) The photo on the left is a simple squamous epithelial cell in brightfield whereas the photo on the right is the same cell in phase contrast. More details can be seen using phase contrast. (Images from Openstax.)
MATERIALS
Each student should have:
1 Microscope
Blue rack with immersion oil
Lens paper
Prepared slides. Slide used to teach how to focus on the microscope that your instructor chooses.
PROCEDURE
- Carefully carry your microscope to your lab bench.
- Plug the scope into an outlet and turn it on by pressing the power switch to the “on” position on the back on the microscope. If no light comes on, make sure the power cord is pressed all the way into the microscope next to the power switch. Also, check the light intensity wheel/ knob at the base of the microscope, and increase it so that you can visibly see the light with the naked eye. Don’t go to full intensity, that is for the highest magnifications.
- Adjust your ocular lenses to fit your interpupillary distance. This is simply the distance between your eyes to be able to see through both oculars as one field of view. With your eyes a few cm from the oculars, you can align the dots of light.
- Place a slide on the stage, held by the stage clips. Use the mechanical stage adjusters to position the slide so the beam of light is centered on the stained material. (You can use the beam of light to find the specimen on the slide.)
- Open the iris diaphragm halfway and adjust the condenser to half a cm below the slide.
- Rotate the nosepiece so that the lowest power objective (4x) is down.
- Using the coarse adjustment knob, raise the stage all the way to the highest position, close to the objective.
- Looking through the ocular lens, lower the stage slowly with the coarse adjustment knob until you see your specimen. It will be blurry at first.
- Use the fine adjustment knob to bring the bacterial cell into sharp focus.
- Adjust the iris diaphragm to narrow the beam and sharpen the focus, but don’t narrow it so much that you lose the color and begin to see halos on objects.
- After focusing on the bacterial cells, you can increase the magnification by rotating the nosepiece to the 10x objective. With the 4x objective bacteria are just a sand-paper texture, not individual objects, with the 10x, slightly larger.
a. Most microscopes are parfocal. This means that the image will remain in focus when changing from a lower power objective to a higher power objective.
b. Only minimal focusing should be necessary with the fine focus adjustment. Do not touch the coarse adjustment knob. - The next two objectives, 50x and 100x, will need the help of immersion oil in order to improve resolution.
a. Rotate the objectives half way before getting to the 50x (not all instructors use the 50x so you can go directly to 100x objective). Place a drop of oil directly on the slide, and rotate the immersion oil objective into the oil.
b. If viewed and focused through the 50x, you can move onto the 100x objective. You may or may not need to add more immersion oil. - Once the specimen is in sharp focus, use the mechanical stage adjusters to explore the slide and find a field of view where the cells are not over-crowded and their shape and size can be easily seen. Show this to your instructor.
- To remove the slide, first rotate the nose-piece so that the objective is away from the slide. If you don’t do this, you may scrape and damage the lens.
- After learning how to focus your first slide, now take the time to view the other 4 prepared slides on your own. Make sure to show your instructor at the total magnification of 1000x to illustrate your microscope skills. Viewing the other 4 slides is also exposing you to the 3 basic bacterial cell shapes: coccus (circle), bacillus (rod), and spirillum (spiral).
- When you are finished using the microscope, clean off the immersion oil from the lenses on the microscope using lens paper and clean the oil from the prepared slides using Kim wipes.
- Return the microscope to the cabinet with the electric cord looped over the ocular lenses.
- Return all items to their location and place the prepared slides to properly labeled tray on the side bench.
REFERENCES
Brown, A. E. (2009). Benson’s Microbiological Applications: Laboratory Manual in General Microbiology. New York: McGraw Hill.
Chess, B. (2015). Laboratory Applications in Microbiology: A Case Study Approach. New York: McGraw Hill.
Leica Microsystems. (2017). Retrieved from https://www.leica- microsystems.com/typo3temp/_processed_/0/9/csm_Leica_DM300_95a75bc2b1.jpg
Microbus. (2015). Retrieved from Microscope-Microscope.org: http://www.microscope- microscope.org/basic/microscope-parts.htm
Microscope Detective. (n.d.). Retrieved from Types of Microscopes and their Uses: http://www.microscope- detective.com/types-of-microscopes.html#sthash.4fZLMkx5.dpbs
OpenStax. (2016, November 1). Microbiology. Retrieved from https://legacy.cnx.org/content/col12087/1.4


