
Lab 10: Spirometry
Materials needed and setup
EQUIPMENT
The Schiller ultrasonic spirometry (SpiroScout) system is a combined ECG-spirometry system that can be selected for cardiovascular or pulmonary function simply by changing the peripheral hardware that is attached to the main unit (AT-102) via the patient cable.
The Schiller spirometry system is an open pneumotacho-pulmonary measuring system that allows thorough cleaning of the components between subjects. By using one time use disposable Scout tubes (mouthpiece), potential HIV (AIDS) or TB infection is prevented. SO BE SURE TO USE ALCOHOL TO CLEAN SHARED EQUIPMENT.
IMPORTANT: Before starting the experiment the subject should practice breathing through the mouth piece with nose clips on so that he or she becomes familiar with this type of breathing. The subject should be in a standing position.
Background
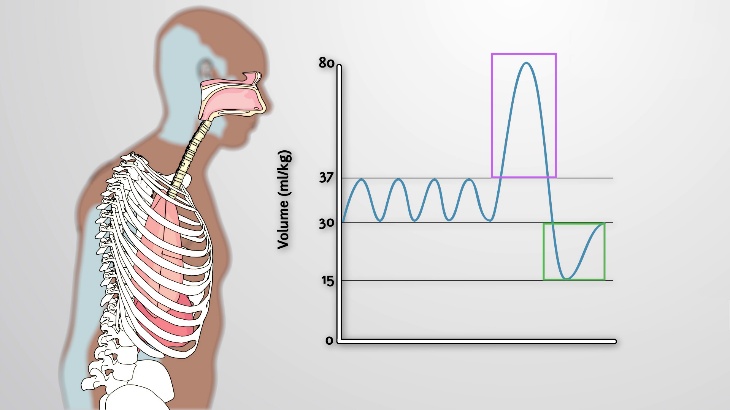
Human lung capacity is the total amount of air the lungs can hold, which is about 6 liters for an adult male and varies based on age, gender, and body composition. It is measured through spirometry and includes various lung volumes like tidal volume (air from normal breathing), inspiratory reserve volume (additional air inhaled), expiratory reserve volume (additional air exhaled), and residual volume (air left in lungs after exhalation).
Factors affecting lung capacity
- Age: Lung function naturally declines after about age 35.
- Gender: Men typically have a larger lung capacity than women.
- Body size and composition: Factors like height and weight influence lung capacity.
- Altitude: Living at high altitudes can lead to a larger lung capacity.
- Respiratory diseases: Conditions like asthma or COPD can change lung volumes.
ABBREVIATIONS AND DEFINITIONS
| RR | Respiration Rate | The number of breaths per minute |
| MV | Minute Ventilation | The volume of air moved in one minute |
| TV | Tidal Volume | The volume of air inspired or expired during a breath when individual is at rest. |
| ERV | Expiratory Reserve Volume | The volume of air that can be expired after a normal expiration. |
| IRV | Inspiratory Reserve Volume | The volume of air that can be inspired after a normal inspiration. |
| VC | Vital Capacity | Maximum amount of air that can be moved in one exhalation. VC=TV+IRV+ERV |
| TLC | Total Lung Capacity | Maximum amount of air that can be in the lungs. |
| SVC | Slow Vital Capacity | The volume of air that can be expired following a deep inspiration. |
| FVC | Forced Vital Capacity | The volume of gas expired by the quickest possible exhalation after a maximal inhalation. |
| FEV1 | Forced Expiratory Volume in one second | The volume of air moved during the first second of forced expiration. This is the first second of FVC. |
| MVV | Maximum Voluntary Ventilation | The maximum volume of air that can be moved on expiration while breathing as deeply and as rapidly as possible. |
| RV | Residual Volume | Volume of air always present in the lungs |
| AVR | Alveolar Ventilation Rate | Amount of air that reaches the alveoli and is available for gas exchange. Anatomic dead space where air that moves in and out of the conducting tubes and never reaches the alveoli. |
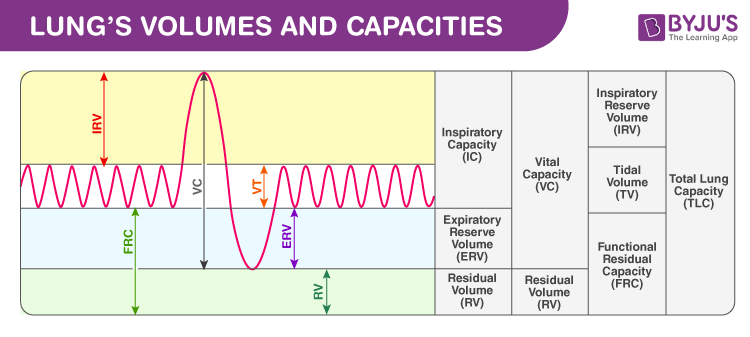 Practice: LOOK AT THE GRAPH ABOVE AND QUANTIFY ALL THE LUNG VOLUMES.
In this laboratory exercise you will measure your lung volumes and various capacities by spirometry. The ability of a patient to ventilate the lungs in a given time period is an excellent indicator of the functional capacity of the lungs.
Procedure:
1. Setting up the SpiroScout Ultrasonic Spirometry System
a. Plug in the power cable into the back of the Cardiovit AT-102 System. Make sure that the power I/O light is on.
b. Insert the plug of the spirometry flow sensor into the socket marked RS 232–Flow Sensor on the right hand side of the unit and tighten the two securing screws. CAUTION: The flow sensor SpiroScout contains a sensitive measuring device and must always be handled with care and not be dropped or subjected to any sudden blows.
2. Press the ON button on the keyboard.
3. Insert the ScoutTube. The ScoutTube (the disposable mouthpiece) can only be positioned in one direction and no force is necessary to insert it. Align the arrow on the ScoutTube with the notch in the SpiroScout and push until fully home. The ring of the tube should be recessed in.
4. In order to select pulmonary function testing, you need to enter the patient data first: Press PATIENT DATA. Type in data using the keyboard. Movement from one data field to another is accomplished by using the ENTER key (or Down Arrow key  ). Wrongly typed characters can be deleted with the DELETE key. Note: If a new patient name is entered (or the machine is turned off), all the previous patient’s data are automatically deleted.
Input of patient data:
a. Patient number: OMIT
b. Last name:
c. First name:
d. Born (Date of birth):
e. Age: Cardiovit will calculate this.
f. Sex:
g. Height in inches:
h. Weight in lbs.:
i. Blood pressure in mm Hg (7 figures max) – e.g. 120/80
j. Ethnic: C/H/B/A/M (Causasian /Hispanic /Black /Asian / Mexican)
k. Medication: OMIT.
l. Ref-No.: OMIT
m. Pacemaker: Yes/No
5. Once all patient data has been entered, select MENU.
6. To enter the pulmonary testing mode, press SPIRO (you may have to select MENU a second time to find this option).
The following describes the procedures needed to perform the typical spirometry tests which are performed in order to assess pulmonary function.
Each student will calibrate the spirometry unit and perform the pulmonary function tests described below. Repeat each measurement so that good readings are obtained three times for each procedure (three readings are required to meet American Society of Thoracic Medicine standards.) NOTE: At the end of each test press stop in order to let the system know that you have finished. If any one of your three readings appears too large or small, ask your instructor for assistance in deleting it.
1. To measure Minute ventilation (MV), Select MVV—Maximum Voluntary Ventilation. The subject puts on a nose clip. The subject stands and places the mouthpiece in their mouth. Subject should exhale before starting the measurement. The computer operator hits RUN TEST/ START. When the “Ready for Measurement” message appears on the screen the subject breathes normally for 12 seconds, without looking at the screen. When the subject has the mouthpiece in their mouth the computer operator will hit RUN TEST/ START for each test. THE LIPS MUST FORM A TIGHT SEAL AROUND THE MOUTHPIECE! You do not need to hit STOP. The test automatically stops after 12 seconds. To begin the next test, simple press RUN TEST/ START again. When all three tests are completed, press REVIEW/ PRINT, then select PRINT and then press PRINT MEAS1. The report will show you the values of Maximum Voluntary Ventilation (MVV), Respiratory Rate (RR), and Tidal Volume (TV). To calculate Minute Ventilation, multiply RR x TV.____L/min
2. Press RESUME and then press TEST, and then press SVC (Slow vital capacity). Read the directions on the screen. The subject stands and places the mouthpiece in their mouth. The computer operator will hit RUN TEST/ START. When the “Ready for Measurement” message appears on the screen the subject will take three normal breaths and then perform a vital capacity reading by taking a maximum inhalation followed immediately by the biggest exhalation possible. The computer operator will press END TEST/ STOP after the exhalation. Repeat this test two more times by pressing RUN TEST/ START each time. When the tests are completed the computer operator will hit REVIEW/ PRINT, then select PRINT and then press PRINT MEAS1.
3. Press RESUME and then press TEST, and select FVC (Forced vital capacity). Read the directions on the screen. The computer operator will hit RUN TEST/ START. When the “Ready for Measurement” message appears on the screen the subject will take the deepest inspiration, put the mouthpiece in her mouth and give the strongest, fastest expiration possible and at the end of this expiration take one full inspiration before the test is ended. Repeat this test two more times. Press RUN TEST/ START to begin each new test. When the tests are completed the computer operator will hit REVIEW/ PRINT, then select PRINT and then press PRINT MEAS1.
4. Press RESUME and then press TEST, and select MVV (maximum voluntary ventilation). The subject inserts the mouthpiece. The computer operator will hit RUN TEST/ START. When the “Ready for Measurement” message appears, the subject will breathe in and out as fast and as hard as possible for 12 seconds. The computer will stop the test once 12 seconds has been reached. Have the patient sit down after the test as they will be lightheaded. When the tests are completed the computer operator will hit REVIEW/ PRINT, then select PRINT and then press PRINT MEAS1.
5. To turn off Cardiovit 102, press the OFF key.