7 Senses
Learning Objectives
- Distinguish between general senses and special senses.
- Identify the three layers of the skin.
- Identify the sensory receptors of the skin and their functions.
- Conduct the two-point discrimination test of the mechanoreceptors of the skin.
- Perform a thermoreceptor experiment of the skin.
- Identify the structures of the eye and their functions.
- Compare the features of the human eye model with those of the sheep eye through dissection of the sheep eye.
- Perform visual tests to evaluate visual acuity, astigmatism, accommodation, color vision, photopupillary reflex, and blind spot.
- Identify the structures of the ear and their functions.
- Conduct a sound localization test using a tuning fork.
- Relate the sense of taste to the sense of smell by conducting a chemoreception test.
SENSES
The human body has two basic types of senses: general senses and special senses. General senses correlate to the cutaneous sensations and include the sensations of touch, pain, temperature, pressure, and proprioception (body position and movement). Sensory receptors to detect these sensations are distributed throughout the body in the skin, muscles, organs, and joints. Special senses are those detected by specialized sensory organs in the head, including vision (eyes), hearing and balance (ears), smell (nose), and taste (tongue). These senses rely on specific structures within these sensory organs: retina (vision), cochlea (hearing), vestibular apparatus (balance), olfactory receptors (smell), and taste buds (taste).
Sensory receptors are specialized nerve cells that respond to a stimulus in the internal and external environment by generating a nerve impulse. Sensory receptors are categorized based on the type of stimulus they detect. The stimulus may be in one of four forms: mechanical stimulus (pressure, touch, vibration, and sound); chemical stimulus (odors or taste); thermal stimulus (temperature changes); and electromagnetic stimulus (light and magnetic fields). (Table 7.1)
Table 7.1: Types of Sensory Receptors in the Human Body
|
Type of Sensory Receptor |
Stimulus |
Location |
|
Mechanoreceptor |
Touch, pressure, vibration, & tension |
Skin, ears, muscles |
|
Thermoreceptor |
Temperature |
Skin, hypothalamus |
|
Nociceptor |
Pain |
All tissues & organs except the brain |
|
Photoreceptor |
Light |
Eyes |
|
Chemoreceptor |
Chemicals |
Tongue, nose |
GENERAL SENSES
Human skin consists of 3 layers: epidermis, dermis, and subcutaneous tissue (outermost layer to innermost). Within these layers, it contains various sensory receptors that detect touch, pain, temperature, and pressure. Cutaneous sensory receptors can either be free nerve endings or encapsulated by epithelial cells that enhance reception. Free nerve endings detect pain and temperature. Encapsulated receptors detect touch and pressure. (Figure 7.1)

Figure 7.1 Sensory receptors found in the layers of the skin.
Note to students: Write all data and answers to questions on the Lab Report provided.
Activity 1: Two Point Discrimination Test
The concentration of sensory receptors differs in various parts of the body, reflecting the need for higher sensory acuity in specific areas. In this activity, you and a partner will determine the relative concentration of tactile receptors (type of mechanoreceptor) over different areas of the body.
- Designate one student as the subject and the other student as the observer.
- The subject will sit with their eyes closed.
- The observer will touch the subject’s skin with two blunt probes simultaneously and gently on four locations listed below, starting at 0 mm and widening the gap between them until the subject feels two distinct points.
- Forearm
- Back of the neck
- Index finger
- Back of the hand
- The subject will state that they feel one point or two points for each trial.
- Once the subject states that they feel two points, the observer will record the distance in millimeters between the two blunt probes on the Lab Report.
- Answer the following questions based on the recorded data:
a. Which location on the body has the greatest density of tactile receptors (shortest distance that two points can be felt)?
b. Which location on the body has the least density of tactile receptors (largest distance)?
c. Why do you think the location with the greatest density has higher density than the location with the least?
Activity 2: Adaptation to Temperature
The free nerve endings along the epidermis layer of the skin respond to changes in temperature.
- Using three glass dishes, obtain ice water, room temperature tap water, and warm water (45-50 ᵒC) from the water bath.
- Immerse your left hand in the ice-water dish and your right hand in the warm water for 30 seconds.
- Then place both hands in the glass dish with room temperature tap water.
- How do your hands feel? Is there a difference? Record the sensations of the left and right hands on the Lab Report.
- Explain your results.
SPECIAL SENSES
EYE: VISION
The eye is a special sense organ responsible for vision. It captures light and converts it into electrical signals that the brain interprets as images. The eye has 3 layers: sclera, choroid, and retina (outermost to innermost). The sclera is made up of strong, tough white fibrous connective tissue that protects and surrounds most of the eye. The most anterior part of this layer is the cornea, which is a transparent membrane that allows light to enter the eye. The choroid is the vascular layer that supplies the eye with oxygen and nutrients. The retina is the innermost layer that contains the photoreceptors, the rods and cones. These photoreceptors detect light and convert it into electrical signals. Rods are highly sensitive to light and are responsible for night vision and peripheral vision. Cones are also light sensitive, but less so. They are responsible for detecting color. Humans have three types of cones, each sensitive to a different wavelength of light: red, green, and blue. By combining the signals from these three types of cones, the brain can perceive a wide range of colors. At the posterior side of the eye, the optic nerve exits the retina. This point is where the optic disc is. No vision is possible at this location due to the absence of rods and cones. This is also known as the blind spot.
The iris, the colored part of the eye, contains smooth muscle that controls the size of the pupil (hole), which regulates how much light enters the eye. Light then continues through the lens. The lens bends and focuses light on the retina at the fovea centralis. The lens is able to bend due to being attached to the suspensory ligaments, which are attached to ciliary muscle. When the ciliary muscle contracts, it relaxes the suspensory ligaments, allowing the lens to become more rounded to focus on near objects. When the ciliary muscle relaxes, the suspensory ligaments tighten, pulling the lens flatter to focus on objects in the distance. This process is called accommodation.
The anterior chamber of the eye, the space between the cornea and lens, is filled with aqueous humor. The aqueous humor is a clear, watery fluid that supplies essential nutrients to the avascular areas of the eye. It also regulates eye pressure. The aqueous humor also contributes to bending light to help focus images onto the retina.
The posterior chamber, called the vitreous cavity, is the area between the lens and the retina. It is filled with vitreous humor, a transparent, jelly-like substance. The vitreous humor maintains eye shape, protects the retina by acting as a cushion and holds it in place, supplies nutrients to the retina, and allows the light image to reach the retina. (Figure 7.2)
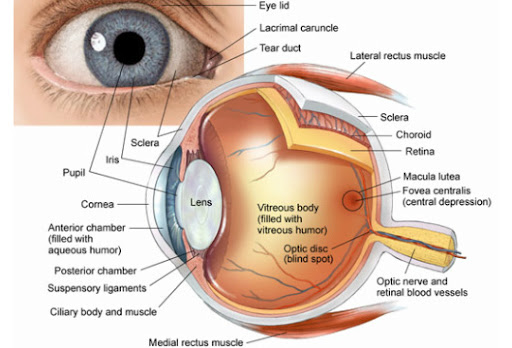
Figure 7.2: Anatomy of the eye
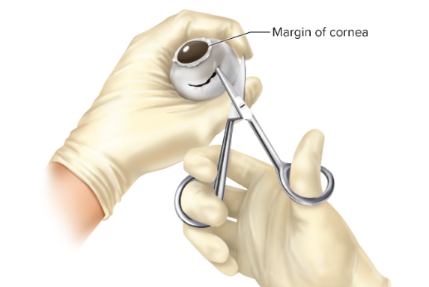
Activity 3: Dissection of a Sheep Eye
Compare the anatomy of a sheep eye with the human eye model.
- Per lab bench, obtain safety glasses, a sheep eye, dissecting tray, scissors, scalpel, forceps, and a pair of gloves for each student participating in the dissection. Put on the safety glasses.
- Use the scalpel to slice into the wall of the sheep eye about 1 cm away from the cornea. Switch to scissors and cut all the way around the eyeball.
- Gently separate the two components.
- Remove the jellylike vitreous humor (the lens may be attached) from the posterior section of the eye and place on the dissecting tray.
- Separate the lens from the vitreous humor. Feel the hardness of the lens.
- Inside of the posterior section, use forceps to gently detach the retina—the thin, nearly colorless to cream-colored membrane (film).
- Peer inside the posterior section to find the optic disc—where the retina may be still attached.
- Observe the choroid layer of the eye within the inside of the posterior section. It is the iridescent area.
- Observe the ciliary muscle, iris, pupil, and cornea of the anterior section.
- When the dissection is completed, place the dissected sheep eye in the bucket as directed by the instructor.
- Wash all dissecting tools and trays and return to the proper location.
- Answer the following questions on the Lab Report:
a. Which layer of the sheep eye was the most difficult to cut?
b. How do you compare the shape of the pupil of the sheep eye with the human eye?
c. Describe the lens of the dissected sheep eye.
Activity 4: Visual Acuity Test
Visual acuity refers to the “sharpness” of your vision, or how well you can see detail. Determine your visual acuity using a Snellen chart as directed by your instructor. A normal eye can read the line of letters marked 20 at 20 feet (red line) and is designated as 20/20 vision. The letter at the top of the chart is marked 20/200. The normal eye can read letters of this size at a distance of 200 feet. The smallest line of letters that the person can read accurately determines their visual acuity. If a person has 20/40 vision that means they can see at 20 feet what a person with normal vision can see at 40 feet. This condition is known as myopia, or nearsightedness. If a person has 20/10 vision that means that they can see at 20 feet what a person with normal vision can see at 10 feet. This is considered better than normal vision. Someone with the condition hyperopia, or farsightedness, generally sees distant objects more clearly than close ones.
Note: If you wear eyeglasses, perform this test both with and without them.
- Designate one student as the subject and the other student as the observer.
- The subject will stand 20 feet from the Snellen chart with one eye covered. 20 feet should be marked on the floor with colored tape.
- The observer will stand close to the Snellen chart to confirm the accuracy of the subject.
- Starting at the top line, read each line of letters until the smallest letters are accurately identified.
- Record your results on the Lab Report.
- Repeat Steps 2-5 for the other eye.
- Switch roles and repeat Steps 2-6.
Activity 5: Astigmatism
Acuity can also be reduced by astigmatism. Astigmatism is caused when one of the transparent surfaces (i.e. cornea or lens) of the eye is not uniformly curved in all planes. Astigmatism may be detected by viewing a series of radiating lines on an astigmatism chart from a distance of 10 feet. To astigmatic individuals, some lines will look different, appearing sharper, thicker, or darker than the other lines. To the normal eye, all lines will appear the same. Determine whether and in what way your right and/or left eye is astigmatic.
Note: If you wear eyeglasses, perform this test both with and without them. You can also detect if your eyeglasses correct astigmatism by looking at the chart after rotating the eyeglasses 90ᵒ.
- Designate one student as the subject and the other student as the observer.
- The subject will stand 10 feet from the Astigmatism chart with one eye covered. 10 feet may be marked on the floor with colored tape.
- The observer will stand close to the Astigmatism chart to read line numbers.
- The subject will look at the center of the Astigmatism chart and state the number of which, if any, lines appear blacker, grayer or less distinct, wavy or less clear.
- Record your results on the Lab Report.
- Repeat Steps 2-5 for the other eye.
- Switch roles and repeat Steps 2-6.
Activity 6: Near Point Accommodation of the Eye
The shape of the lens changes as the eye accommodates to view objects at different distances. When you are looking at a distant object, the lens is in a flattened state. When you are looking at a closer object, the lens bends and becomes more rounded. The elasticity of the lens determines how well the eye can accommodate. As a person ages, the lens gradually loses its elasticity and they will have difficulty focusing on close objects and may require the use of reading glasses or bifocals. This condition is called presbyopia. Determine the near point accommodation of each eye. This point is the nearest point at which the pencil tip can be clearly seen.
- Designate one student as the subject and the other student as the observer
- Close one eye and hold a pencil upright by the eraser at arm’s length in front of the eye you are testing.
- Move the pencil from arm’s length toward your eye, focusing on the pencil tip.
- Move the pencil toward you until the pencil tip is out of focus.
- Have the observer measure the distance in centimeters between the pencil tip and your eye. Record on the Lab Report.
- Repeat Steps 2-5 for the other eye.
- Compare your near-point measurements to the normal age values found in Table 7.2:
|
Table 7.2 Near Point Accommodation and Age Correlation |
||||||
|
Age (years) |
10 |
20 |
30 |
40 |
50 |
60 |
|
Near Point (cm) |
9 |
10 |
13 |
18 |
50 |
83 |
8. Switch roles and repeat Steps 2-7.
9. Answer the following questions on the Lab Report:
a. What age does your right eye test as?
b. What age does your left eye test as?
c. Is there any difference in age?
Activity 7: Color Vision Test
Color blindness, or color vision deficiency, is the inability to see or distinguish colors normally. It is not a complete loss of color vision, but rather a reduced ability to differentiate between colors, particularly red and green or blue and yellow. This occurs when there is a lack of certain cones. Red-green color blindness is a sex-linked trait, specifically X-linked recessive. It is more prevalent in males than in females. Test for red-green color blindness by examining the color test plates in the Ishihara color vision test book.
- Designate one student as the subject and the other student as the observer.
- The observer will hold the color test plates approximately 30 inches from the subject.
- The subject will state what number they see. All responses should occur within 3 seconds.
- Compare your responses with the correct answers of the Ishihara book in Table 7.3.
Table 7.3: Correct answer of the Ishihara’s book of Color Plates
|
Number of Plates |
Normal Person |
Person w/ Red-Green Deficiency |
Person w/ Total Color Blindness & Weakness |
|
1 |
12 |
12 |
12 |
|
2 |
8 |
3 |
X |
|
3 |
5 |
2 |
X |
|
4 |
29 |
70 |
X |
|
5 |
74 |
21 |
X |
|
6 |
7 |
X |
X |
|
7 |
45 |
X |
X |
|
8 |
2 |
X |
X |
|
9 |
X |
2 |
X |
|
10 |
16 |
X |
X |
The X mark shows the plate cannot be read by the individual.
5. Write your responses on the Lab Report.
6. Record the answer to this question on the Lab Report:
a. Do you have normal vision or red-green color blindness?
Activity 8: Photopupillary Reflex Test
The photopupillary reflex is an involuntary response of the iris, specifically the pupillary muscles within it. This reflex regulates the amount of light entering the eye by adjusting the diameter of the pupil in response to changes in light intensity. The photopupillary reflex is used to assess the brain stem function. Abnormal photopupillary reflex can be found in optic nerve injury, oculomotor nerve damage, brain stem lesions, and use of medications like barbiturates. Test your photopupillary reflex.
- Designate one student as the subject and the other student as the observer.
- The observer shines the penlight into one of the subject’s eyes.
- Record your observations on the Lab Report: does the size of the pupil become larger or smaller after the light exposure?
- Now turn off the penlight. Observe the diameter of pupil.
- Record your observations on the Lab Report: Does the size of the pupil become larger or smaller?
- Repeat Steps 2-5 and note which is faster: constriction of the iris (pupil size becoming smaller) or dilation of the iris (pupil size becomes larger). Record your observations on the Lab Report.
- Switch roles and repeat Steps 2-6.
Activity 9: Blind Spot Test
The innermost layer of the eye, the retina, receives and responds to incoming light and sends signals to the brain via the optic nerve, allowing you to see. However, there is an area on the retina where the optic nerve and blood vessels leave the eye. There are no photoreceptors located here. This is the optic disc, or blind spot. When light hits that spot no image will be seen. Test each eye to determine the location of your blind spot.
- Designate one student as the subject and the other student as the observer.
- The subject will close their left eye and hold “Blind Spot Test Figure” (Figure 7.3) about 35 cm (about 14 inches) away from their face.
- Stare at the + sign in the figure with the right eye.
- The subject will move the figure closer to their face as they continue to stare at the + sign until the dot on the figure suddenly disappears. This happens when the image of the dot is focused on the optic disc.
- The observer will measure the distance between the right eye and the figure.
- Repeat Steps 2-5 but this time have the subject will close their right eye and stare at the dot using their left eye until the + sign disappears.
- Switch roles and repeat Steps 2-6.

Figure 7.3: Blind Spot Test Figure
EAR: HEARING
The human ear is responsible for both hearing and maintaining balance. The ear is divided into 3 components: outer ear, middle ear, and inner ear. The outer ear includes the auricle and the external auditory canal. The auricle is the fleshy part of the ear attached to the side of the head. The external auditory canal is the canal that leads to the tympanic membrane, or eardrum. The outer ear gathers sound waves and directs them inward to the tympanic membrane. The middle ear includes the auditory ossicles (tiny bones of the ear) that transmit the vibrations of the tympanic membrane to the inner ear. The three ossicles are the malleus (hammer), the incus (anvil), and the stapes (stirrup). The middle ear connects to the nasopharynx via the auditory tube. The auditory tube plays a role in pressure equalization between the middle ear and the pressure outside the ear. It also helps drain fluid from the middle ear and allows air flow for proper hearing function of the ear. The inner ear includes the cochlea, vestibule, and semicircular canals. The cochlea is responsible for hearing as it contains the hearing receptors, known as hair cells. The hair cells convert the sound vibrations into electrical signals that travel to the auditory cortex of the brain by way of the vestibulocochlear nerve. The auditory cortex interprets these signals and allows sound to be perceived. (Figure 7.4)
The vestibule and semicircular canals of the inner ear maintain balance. The vestibule contains the utricle and saccule. The utricle is a bed of sensory cells that detects horizontal head tilts, and the saccule is a bed of sensory cells that detects vertical head tilts. The semicircular canals are three fluid-filled tubes that detect rotational head movements, contributing to balance and spatial orientation.
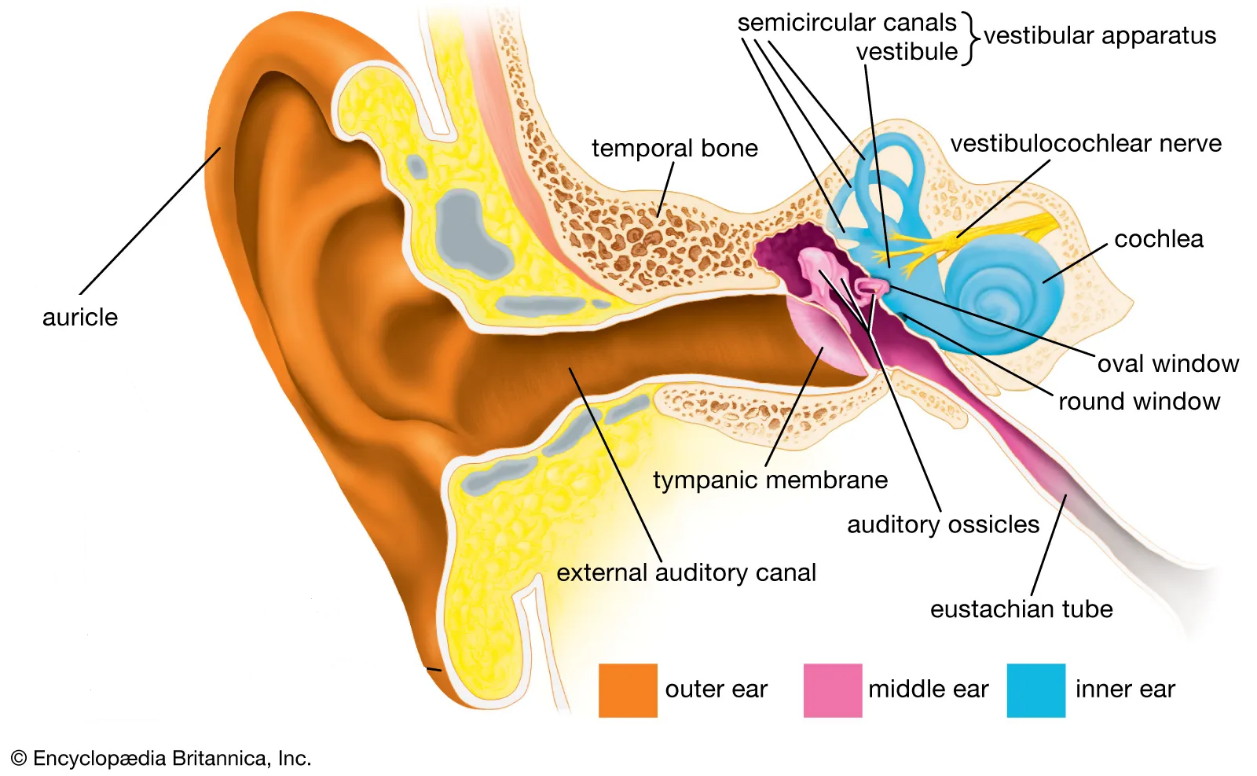
Figure 7.4: Anatomy of the ear.
Activity 10: Auditory acuity test
An auditory acuity test, also known as a hearing test, is a procedure used to measure a person’s ability to hear sounds at different frequencies and volumes. It helps identify hearing loss, ear infections, and other ear-related conditions. We will be carrying out a modification of this test.
- Designate one student as the subject and the other student as the observer.
- The subject will sit in a chair with their eyes closed holding a cup of cotton over one ear to block out sound.
- The observer will strike a tuning fork and then place it close to the uncovered ear and slowly move it straight out and away from the subject’s ear.
- The subject will indicate when the sound of the tuning fork can no longer be heard.
- The observer will use a meterstick to measure the distance in centimeters from the ear to the position of the tuning fork. Record on the Lab Report.
- Repeat Steps 2-5 to test the acuity of the other ear.
- Switch roles and repeat Steps 2-6.
Activity 11: Sound Localization Test
A sound localization test assesses a person’s ability to identify the direction of a sound. Localizing the direction of a sound can be affected by each ear or both ears working together. If one ear has hearing loss, this can negatively affect a person’s ability to localize a sound. Determine your sound localization ability by conducting this test:
- Designate one student as the subject and the other student as the observer.
- The subject will sit in a chair with their eyes closed.
- The observer will strike a tuning fork at the five locations listed below at random.
- Directly below and behind the head
- Directly behind the head
- Directly above the head
- Directly in front of the head
- Directly on the right side of the head
- Directly on the left side of the head
- The subject will state the exact location of the sound in relation to their head.
- Record the subject’s perceptions of where the sound is located on the Lab Report.
- Switch roles and repeat Steps 2-5.
CHEMORECEPTORS: TASTE & SMELL
Taste (gustation) and smell (olfaction) are interconnected special senses that rely on detecting chemical stimuli with chemoreceptors. The papillae are the small bumps on the tongue and consist of four different types based on structure, function and location. Taste buds are located within the papillae and contain clusters of taste sensory receptors that detect chemicals in food, initiating the taste sensation. Each taste bud has all five taste receptors built in: sweet, salt, sour, bitter, and umami. These taste receptors are connected to nerves that transmit the signals to the gustatory cortex of the insula and frontal lobes of the brain to interpret the taste sensations. (Figure 7.5)
(a)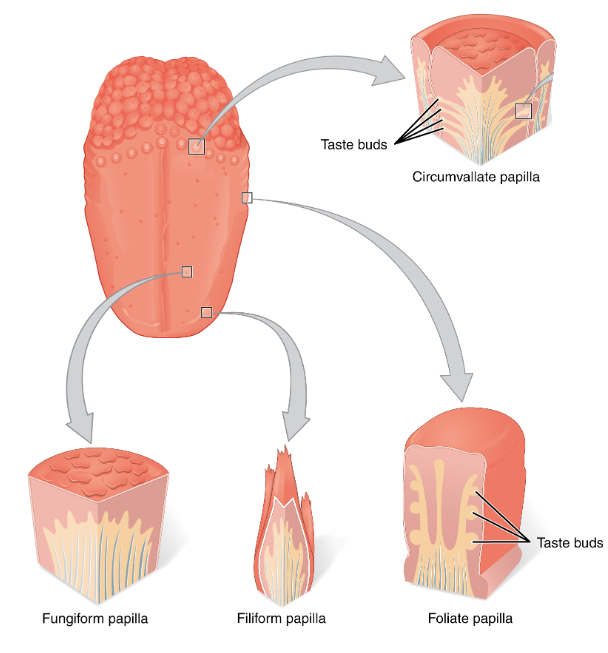
(b)
Figure 7.5: (a) Four different types of papillae on the tongue; (b) Within each of the papillae, there are taste buds that each contain taste receptors of sweet, salt, sour, bitter and umami. Taste buds are connected to nerves to transmit the signal to the gustatory cortex of the brain.
Smell influences taste as the odor molecules from the food travel to the nasal cavity, stimulating the olfactory receptors. The brain then processes olfactory and taste information together to contribute to our perception of flavor.
Activity 12: Correlation between Sense of Taste and Smell
In this activity, to demonstrate the influence sight and smell has on taste, the subject will have their eyes closed and hold their nose.
- Designate one student as the subject and the other student as the observer.
- The observer will collect five Life Savers at random and not show the subject.
Life Saver Color
Life Saver Flavor
Green
Watermelon
Yellow/ white
Pineapple
Red
Cherry
Purple/ Dark red
Raspberry
Orange
Orange
- The subject will sit with their eyes closed and hold their nose.
- The observer will unwrap the Life Saver and place it into the subject’s hand. The subject will place the Life Saver into their own mouth.
- The subject, while holding their nose, will guess the flavor of the candy. The observer will record the guess on the Lab Report.
- The subject will then release their nose and guess the flavor again. The observer will record the guess on the Lab Report.
- Repeat Steps 2-6 four more times. You may switch roles during this process.
- Answer the following question:
- Based on your results, would you say that the sense of smell affects the ability to detect the flavor of the Life Saver candy?
Activity 13: Lab Review
On the Lab Report, answer the questions in the Lab Review section.
Link to Lab Report: Lab 7 Senses Lab Report
REFERENCES
Academy of Eye Care. (n.d.). Eye anatomy. http://www.pceyeglasses.com/eye-anatomy.html
Betts, J. G., Young, K. A., Wise, J. A., Johnson, E., Poe, B., Kruse, D. H., Korol, O., Johnson, J. E., Womble, M., & DeSaix, P. (2022b, April 20). 14.1 Sensory Perception – Anatomy and Physiology 2E | OpenStax. https://openstax.org/books/anatomy-and-physiology-2e/pages/14-1-sensory-perception
Dana Foundation. (2024, February 16). The Senses: Smell and Taste. https://dana.org/resources/the-senses-smell-and-taste/
Hawkins, & E, J. (2025, April 21). Human ear | Structure, Function, & Parts. Encyclopedia Britannica. https://www.britannica.com/science/ear
Mader, Sylvia S. (2023). Laboratory Manual for Human Biology. 17th edition. McGraw-Hill.
Snider, Phillip and Terry Martin. (2024). Laboratory Manual to accompany Hole’s Essentials of Human Anatomy and Physiology. McGraw-Hill Publishing.
Sulich, V. (n.d.). Senses. Pressbooks. https://rvcc.pressbooks.pub/humanbiology/chapter/senses/
TefiM. (2017, March 8). Sensory receptors in the skin. Detailed skin anatomy, beautiful. . . iStock. https://www.istockphoto.com/vector/sensory-receptors-in-the-skin-gm649469362-118036429
Tortora, Gerard J. and Bryan H. Derrickson. (2016). Principles of Anatomy and Physiology, 15th edition. John Wiley and Sons.
