1 Microscopy, Cellular Structure & Function, and Body Tissues
Learning Objectives
- Describe how to handle and care for a compound light microscope.
- Recognize and give the function of the parts of a compound light microscope.
- Correctly use a compound light microscope.
- Identify components of an animal cell on both a diagram and a model.
- State functions of each cellular component/structure of an animal cell.
- Make a wet mount of several sample types.
- Identify slides of various types of body tissue: epithelium (squamous and ciliated columnar), connective tissue (bone, cartilage, blood), neuron, and skeletal muscle.
MICROSCOPY
As we study the human body, we will learn that the basic unit of life is the cell. Our body consists of over 200 different types of cells, but we cannot see these cells with the naked eye. The smallest object we can view with our eyes is about 0.1 millimeter (mm). Let’s put that into perspective: a single grain of sand is 0.5 mm, and we can see smaller than that! But in order to view anything smaller than 0.1 mm, such as a cell, we need to use the essential tool of the biology lab, a microscope.
Microscopy has three basic concepts: magnification, resolving power, and contrast. Magnification is the factor by which the image of a specimen is enlarged. Resolving power is the degree to which two adjacent points in a specimen are seen as separate. Contrast is how well details stand out against the background on an image.
There are various types of microscopes available for use in a laboratory setting. Microscopes can be categorized into light microscopes and electron microscopes based on what is used to produce an image.
Light microscopes can use visible light to magnify an object through glass lenses, producing two-dimensional images. The most commonly used light microscope is the compound light microscope and is called this because light passes through two lenses. The lens closest to the eye is called the ocular lens, while the lens closest to the object (specimen) is the objective lens. Most compound microscopes have one ocular lens, which magnifies 10x, and 3 or 4 objective lenses of different magnifications, that can interchanged. Depending on the specimen, it is routine to stain the specimen with colored chemicals in order to increase the contrast.
Electron microscopes focus a beam of electrons within a vacuum column by using electromagnetic lenses, creating a two or three-dimensional image of the surface of an object. (Figure 1.1a and 1.1b for a comparison of micrographs.) The wavelength of electrons is much smaller than the wavelength of visible light, resulting in higher resolution. Electron microscopes also have the capability of higher magnification than light microscopes. (Table 1 for a comparison of light and electron microscopes.) To enhance the image quality, biological specimens, cells or structures, have to be fixed and coated with a conductive metal, such as gold-palladium alloy, to prevent damage by electrical charging of the specimen surface as the electrons bombard it.

Figure 1.1a A light micrograph of a blood smear, showing hundreds of red blood cells and two white blood cells.
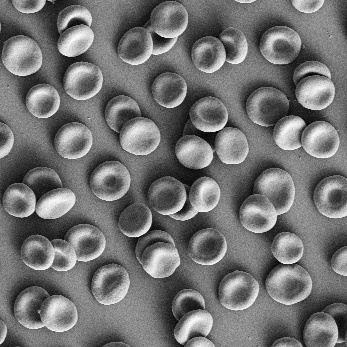
Figure 1.1b Scanning electron micrograph of red blood cells.
|
Table 1 Comparison between a Compound Light Microscope and Electron Microscope |
|
|
Compound Light Microscope |
Electron Microscope |
|
Glass lenses |
Electromagnetic lenses |
|
Illumination by visible light |
Illumination due to a beam of electrons |
|
Lower resolution (≈ 200 nm) |
Higher resolution (≈ 0.1 nm) |
|
Lower magnification (up to 2,000 x) |
Higher magnification (up to 1,000,000 x) |
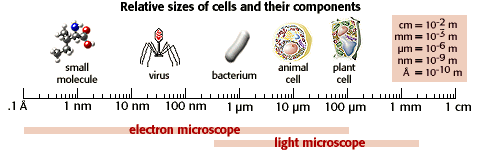
Figure 1.2 A scale to show relative sizes of cells and their components in relation to the type of microscope needed.
Rules for Microscope Use
Observe the following rules using a microscope:
- To carry a microscope to and from your lab bench, grasp the arm with your dominant hand and support the base with the other hand, always keeping the microscope upright.
- The lowest power objective (4x) should be in position both at the beginning and at the end of microscope use.
- Use only lens paper for cleaning lenses.
- Keep the stage clean and dry to prevent rust and corrosion.
- Do not remove parts of the microscope.
- Do not use coarse focus when viewing a specimen with the high-power objective. You can break the slide you are viewing.
- Report any malfunctions.
STEREOMICROSCOPE (Dissecting Microscope)
This instrument has a platform for specimens that can be easily manipulated. It gives a three-dimensional view of a variety of specimens that do not have to be treated (fixed or stained) in advance of their viewing. It is very useful for viewing materials that have to be handled. For instance, if specimens have to be cut open and dissected, the stereomicroscope permits easy access to the stage, and a variety of magnifications. It can be used on living organisms (like fruit flies, parts of plants, animal organs, and other specimens).
COMPOUND LIGHT MICROSCOPE
The compound light microscope uses two sets of lenses and light to view an object. This microscope is used to examine small or thinly sliced sections of objects under higher magnification than would be possible with the stereomicroscope. With this type of microscope the specimens typically have to be mounted on a microscope slide. If the material is very small or thin, it is possible to make a wet mount and look directly at the sample. Otherwise, it is necessary to prepare the specimen by slicing it very thin, fixing it with chemical preservatives, and staining the specimen with colored dyes that bind to different parts of the cell structure. One example is methylene blue, which chemically binds to DNA and colors that material inside the cell (usually changing the colors of the nucleus and chromosomes.)
Note to students: Write all data and answers to questions on the Lab Report provided.
Activity 1: Identifying Microscope Parts
Obtain a compound light microscope from the microscope cabinet, carrying it properly, and place it securely on the lab bench. Label the light microscope, using the text that follows.
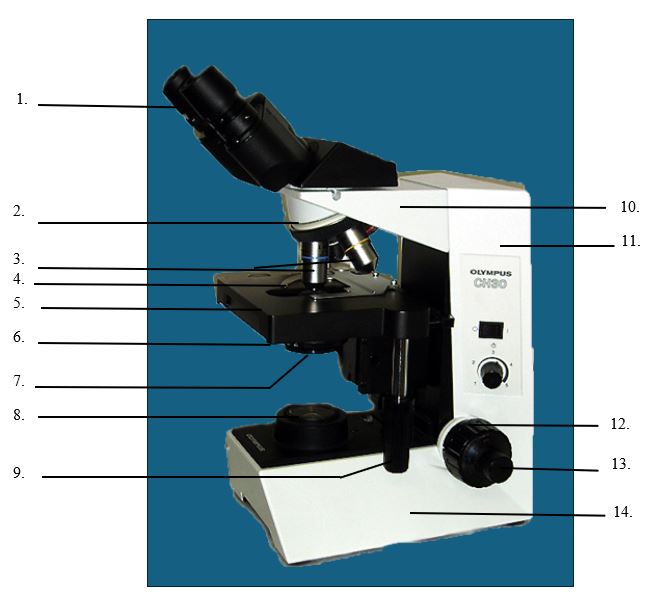
Figure 1.3 Compound light microscope with binocular head and mechanical stage. Label the light microscope using the terms from the following list by recording on the Lab Report.
- Eyepieces (ocular lenses): Ocular lenses generally have 10x magnification. A microscope may have one (monocular) or two (binocular) ocular lenses.
- Body tube: Holds nosepiece at one end and eyepiece at the other end; conducts light rays to your eyes.
- Arm: Supports upper parts and provides carrying handle.
- Nosepiece: Revolving device that holds objective lenses.
- Objectives (objective lenses):
- Scanning power objective: This is the shortest of the objective lenses and is used to scan the whole slide. The magnification is stamped on the housing of the lens, followed by an x. It usually has the magnifying power of 4x.
- Low-power objective: This lens is longer than the scanning lens and is used to view objects in greater detail. Most commonly used is 10x.
- High-power objective: If your microscope has three objective lenses, this lens will be the longest. It is used to view an object in even greater detail. This will typically be a magnification of 40x.
- Oil immersion objective (on microscopes with four objective lenses): Holds a 100x lens and is used in conjunction with immersion oil to view objects with the greatest magnification. This is typically used to observe the smallest cells, such as bacteria, or cell structures.
Since each objective lens has a different magnifying power, the total magnification is calculated by multiplying the magnifying power of the ocular lens by that of the objective in use. Fill in the calculations for total magnification on the Lab Report.
- Coarse-adjustment knob: Knob used to bring object into approximate focus; used only with low-power objective. It is the larger of the two knobs.
- Fine-adjustment knob: Knob used to bring object into final focus. It is the inner smaller knob.
- Condenser: Lens system below the stage used to focus the beam of light on the specimen (the object being viewed).
- Diaphragm: Controls the amount of light rays used to view the specimen.
- Light source: An attached lamp that directs a beam of light up through the specimen.
- Base: The flat surface of the microscope that rests on the table.
- Stage: Hold and supports microscope slides.
- Stage Clips: Holds slides in place on the stage.
- Mechanical stage adjuster (control knobs): Two knobs that are usually located below the stage. One knob controls forward/reverse movement, and the other controls right/ left movement of the stage and slide.
HOW TO FOCUS A MICROSCOPE
- Turn the nosepiece so that the lowest-power lens (4x scanning objective) is in straight alignment over the stage, pointing downwards. Always begin focusing with this objective lens.
- Adjust the height of the stage by using the coarse adjustment knob. Raise the stage as high as it will go. (Do not force the knob or controls of a microscope.)
- Place a slide on the stage and stabilize it with the stage clips. (If your microscope has a mechanical stage, pull back the spring on the slide arms on the stage, and insert the slide between the stage clips.)
- Center the object on the slide as best as you can over the condenser (the circle of light), using the two mechanical stage adjuster knobs located below the stage.
- Adjust the diaphragm to give optimum light by having the diaphragm lever in the middle (facing directly at you).
- While looking into the ocular lenses, use the coarse adjustment knob to slowly lower the stage, increasing the distance between the stage and the objective lens until the object on the slide comes into view and appears almost focused.
- Once the object is seen, you may need to adjust the amount of light. Rotate the diaphragm (lever under the stage) slightly left to increase the light or slightly right to decrease the light.
- Use the fine adjustment knob to sharpen the focus, if necessary. Only use the coarse adjustment knob with the 4x objective. Do not use it with any other objective lens. (To sharpen the image with high magnification objective lenses, use the fine focus adjustment knob.)
- Practice having both eyes open when looking through the eyepiece, as this greatly reduces eyestrain. You can adjust the distance between ocular lenses, just as you would using a pair of binoculars.
- Compound light microscopes are parfocal—that is, once the object is in focus with the lowest power objective, it should also be almost in focus with the higher power. Rotate the nosepiece to bring the next higher objective (10x objective) into position until you hear a click.
- Use the fine adjustment knob if more focusing is necessary.
- Your microscope is parcentric (the focus remains near the center of the field of view). The object on the slide should still be in your field of view (the circular area that is visible through the lenses), but it will not be centered any longer. Use the mechanical stage adjuster knobs to center the object in your field of view.
- Rotate the nosepiece to bring the next higher objective (40x objective) into position until you hear a click.
- Use the fine adjustment knob if more focusing is necessary. (Remember do not use the coarse adjustment knob. This only can be used with the 4x objective.)
- Use the mechanical adjuster knobs to center the object in the field of view, if necessary.
- Through this process, you may need to adjust the diaphragm to allow more light through the condenser. This can be done by moving the lever under the stage to the left.
- When you have finished your observations of this slide, rotate the nosepiece until the lowest power objective (4x) clicks into place, lower the stage, remove the slide, and return it back to the proper location. Be sure to draw or photograph (using your cell phone, if you wish) what you see at each magnification, as directed by your instructor.
Activity 2: Inversion
Inversion refers to the fact that a microscopic image is upside down and reversed since there are mirrors in the microscope that reverse the image.
- Place a slide of the letter e on the microscope stage between the stage clips.
- In Space 1 of the Lab Report, draw the letter e as it appears on the slide as it sits on the stage (with the unaided eye, not looking through the ocular).
- In Space 2, draw the letter e as it appears when you look through the ocular.
- What difference do you notice?
- Move the stage/slide to the right. Which way does the image appear to move?
- After focusing at the lowest objective (4x), rotate the nosepiece to the next higher objective (10x). In Space 3, draw the letter e in the position you see in your field of view.
- What difference do you observe in your field of view of the letter e when increasing the magnification (move from 4x objective to 10x objective)?
- When finished with Activity 2, please return the slide back to the correct slide tray and rotate the nosepiece back to the lowest objective (4x).

Activity 3: Depth of Field
Depth of Field refers to how much of a thick specimen appears in focus at a given magnification. It is the greatest on the lowest objective (4x), meaning more objects are in focus within the field of view. Each time you change to a higher power objective, the depth of focus becomes narrower and not as many objects remain in focus. The top of the specimen may be clear, while the middle and bottom layers are out of focus. You will have to focus up and down to see the different layers clearly. For example, when examining a slide with 3 colored threads: When you focus on the top thread, the other 2 threads are only slightly out of focus. As you increase magnification on your specimen you can only focus on one layer at a time. At the next higher power objective the top thread remains in focus, but the middle thread is out of focus and the bottom thread is blurry. When switching to the highest power objective, only the top thread remains in focus and the middle and bottom threads are blurry or out of focus.
- Place a slide of 3 colored threads on the microscope stage between the stage clips.
- Using the lowest objective (scanning 4x objective) and mechanical stage adjuster knobs, center the slide where the threads cross within the field of view. Follow how to focus a slide based on the How to Focus a Microscope section of the lab manual.
- Slowly focus up and down using the fine adjustment knob at the 10x and 40x objectives. Notice that only one thread is in focus at a time.
- Record the order of the threads on the Lab Report in the corresponding table.
CELLULAR STRUCTURE & FUNCTION
According to the cell theory, (1) all organisms are composed of one or more cells; (2) the cell is the basic living unit of an organism; and (3) all cells arise from preexisting cells. How cells are structured, arranged, and interact with each other affects the overall organization and construction of the body. Cellular processes, such as biochemical reactions, cellular respiration, protein synthesis, and signal response, help to determine how the body organs function.
Cells contain structures called organelles (“little organs”) that have specialized functions. Although cells vary in organization, size, and function, all share three structural features: (1) all cells are surrounded by a plasma membrane that defines the boundary of the living material and regulates the movement of molecules into and out of the cell; (2) all contain a region of DNA (deoxyribonucleic acid), which stores genetic information; and (3) all contain cytoplasm, everything inside the plasma membrane that is not part of the DNA region. (One exception is that mature red blood cells have a plasma membrane and cytoplasm, but no nucleus.) Other common organelles are mitochondria, endoplasmic reticulum, ribosomes, and Golgi apparatus. Review Figure 1.4 to learn the structure of a typical animal cell.
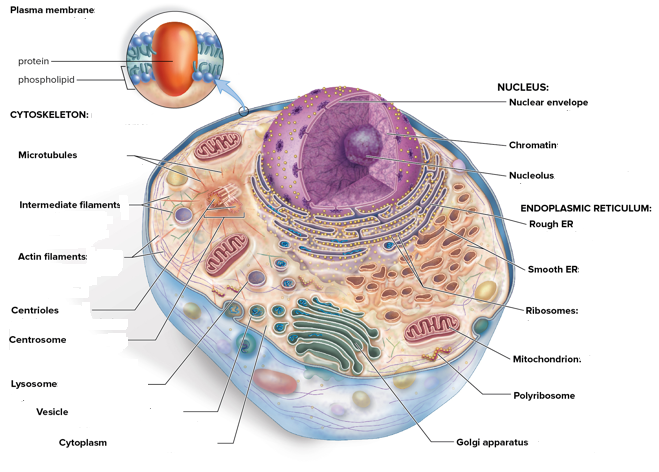
Figure 1.4 The structure of a generalized animal cell. © McGraw-Hill Education
Activity 4: Identifying the cellular components on an animal cell model
Label the following image of an animal cell model that was displayed in lab by recording your answers on the Lab Report.
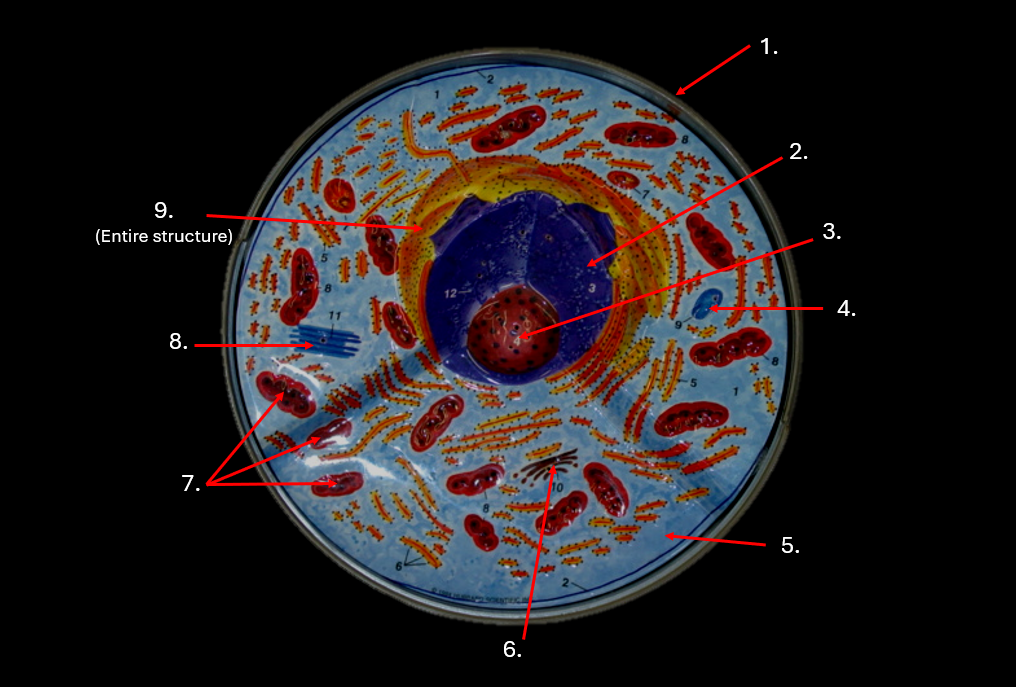
Figure 1.5 Image of an animal cell model
Activity 5: Function of Cell Organelles
Match the cell organelles (a – n) with their correct functions (1 – 14) by recording your answers on the Lab Report.
|
|
Cell Organelles |
|
|
Function |
|
a. |
Centrioles |
|
1. |
Membranous channels with no ribosomes; synthesizes lipids (cholesterol and phospholipids) |
|
b. |
Cytoplasm |
|
2. |
Site of ribosome synthesis |
|
c. |
Cytoskeleton |
|
3. |
Contains a double-membrane; powerhouse of cell; produces the energy molecule ATP through cellular respiration |
|
d. |
Golgi apparatus |
|
4. |
Membrane-bound sac that contains digestive enzymes to break down macromolecules (proteins, carbohydrates, lipids & nucleic acid) |
|
e. |
Lysosome |
|
5. |
Short cylinders of microtubules that act as the foundation for formation of mitotic spindle during cell division |
|
f. |
Mitochondrion |
|
6. |
Acts as a barrier that selectively controls what enters and exits a cell |
|
g. |
Nuclear envelope |
|
7. |
Protective barrier that separates the nucleus’s contents from the cytoplasm |
|
h. |
Nucleolus |
|
8. |
Composed of microtubules, intermediate filaments, and actin filaments; responsible for shape of the cell and cellular movement |
|
i. |
Nucleus |
|
9. |
Small fluid-filled sacs that transports and stores cellular substances |
|
j. |
Plasma membrane |
|
10. |
Membranous channels with ribosomes attached; synthesize proteins |
|
k. |
Ribosome |
|
11. |
Gel-like substance that holds and supports the cell’s organelles; site of metabolic processes |
|
l. |
Rough endoplasmic reticulum |
|
12. |
Site of protein synthesis |
|
m. |
Smooth endoplasmic reticulum |
|
13. |
Stores and protects the cell’s genetic material (DNA); acts as the control center of the cell |
|
n. |
Vesicle |
|
14. |
Stack of small flat sacs that processes and packages proteins and lipids |
Activity 6: How to Prepare a Wet Mount Slide
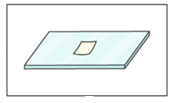
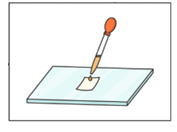
A wet mount is a technique of placing a small sample in a droplet of water or stain on a slide for viewing under a microscope. The wet mount is then covered with a coverslip to protect and contain the sample and also to protect the objective lenses of the microscope.
We will be carrying out 3 wet mount procedures using various types of samples: animal tissue sample, plant tissue sample, and protozoan sample.
Animal Tissue Sample
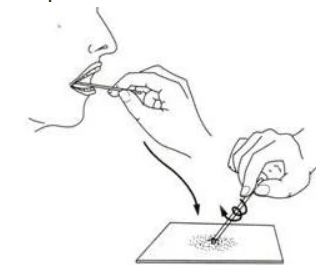
- Obtain a flat toothpick and gently scrape the inside of your cheek with the toothpick. Place the scrapings on a clean glass slide. Discard used toothpicks in the regular trash can near your lab bench.

- Add a drop of methylene blue to the slide. This liquid will stain your hands and clothes, so handle it carefully.

- Place a coverslip over your sample by placing one edge of the coverslip just at the edge of the methylene blue solution at a 45-degree angle. Carefully lower the coverslip onto the drop.
- Observe the wet mount under a microscope by referring to the How to Focus a Microscope section of the lab manual.
- Locate the nucleus (the central, round body), the cytoplasm, and the cell membrane (outer cell boundary). Label Figure 1.4 by recording your answers on the Lab Report.
- When you are finished, dispose of slide in the container at the center of your lab bench labeled “Used Slides.”
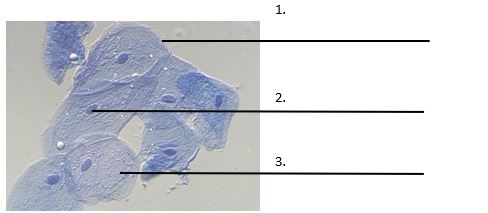
Figure 1.6 Cheek Epithelial Cells. Label the nucleus, cytoplasm, and the cell membrane on the Lab Report.
Plant Tissue Sample
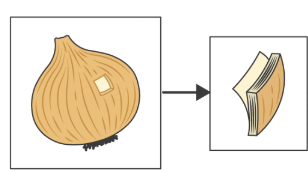
- Using a small knife and forceps, peel off a thin, translucent layer of onion skin from the inner side of a piece of onion. (This onion skin is located between thicker layers of the onion.)
- Place the onion skin sample flat onto a clean glass slide. Try to prevent the onion skin from folding over on itself.
- Place a drop of iodine solution onto the onion skin sample.
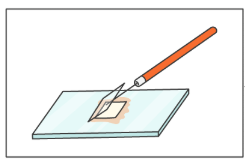
- Cover the sample and iodine with a coverslip by placing one side of the coverslip just at the edge of the iodine solution at a 45-degree angle. Carefully lower the coverslip onto the drop. This technique helps prevent air bubbles from becoming trapped under the coverslip.
- Observe the onion skin sample under a microscope by referring to the How to Focus a Microscope section of the lab manual.
- Locate the cell wall and nucleus of the plant tissue. Label Figure 1.4 by recording your answers on the Lab Report.
- When you are finished, dispose of slide in the container at the center of your lab bench labeled “Used Slides.”
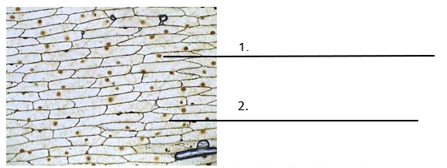
Figure 1.7 Onion epidermal cells. Label the cell wall and nucleus on the Lab Report.
Protozoan Sample: Euglena
Euglena are an example of protozoa, specifically phytoplankton. They are unicellular organisms with a flagellum to facilitate movement. They are green in color, as they primarily produce their own food through photosynthesis, just like plants.
- Make a wet mount of Euglena by using a drop of Euglena culture from the bottom of the container, and adding a drop of Protoslo® (methyl cellulose solution) onto a slide. (The Protoslo® slows the organism’s swimming.)
- Mix thoroughly with the transfer pipet and place a coverslip over the sample.
- Observe under the microscope. Be sure to scan the slide for Euglena by moving the slide around on the stage by using the mechanical stage adjuster knobs. Start at the upper left hand corner and move the slide forward and back as you work across the slide from left to right. The Euglena may be at the edge of the slide because they seek out oxygen (air) and show an aversion to Protoslo®. Observe them at scanning, low and medium power.
- Use Figure 1.8 a to help identify the structural details of Euglena. Compare your Euglena specimens with Figure 1.8 b. List the labeled features that you can see on the Lab Report.
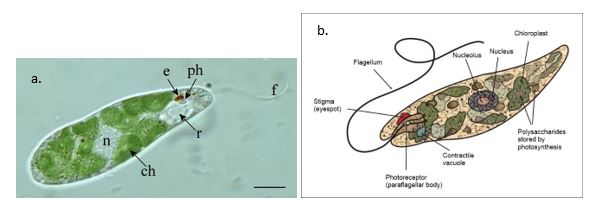
Figure 1.8 A comparison of a micrograph (a) with an illustration (b) to better identify structures of Euglena. (1.6a e, eyespot; ph, photoreceptor; f, flagellum; r, receptor (contractile vacuole); ch, chloroplast; n, nucleus)
BODY TISSUES
A group of similar cells that work together to perform a specific function within the body forms body tissue. There are four types of tissues within the body: epithelial tissue, connective tissue, muscle tissue, and nervous tissue. Figure 1.9 shows the four types of tissues and lists examples of subtypes and locations. The body is further organized as tissues are grouped into organs and then organs are grouped into organ systems, ending with the organ systems forming a living organism.

Figure 1.9 Four Types of Body Tissue: Example of the four types of tissues are shown: nervous tissue, stratified squamous epithelial tissue, cardiac muscle tissue, and connective tissue. (Micrographs provided to Openstax by the Regents of University of Michigan Medical School © 2012)
Epithelial tissue is made up of large sheets of cells that cover all surfaces of the body exposed to the environment along with lining the body’s inner cavities, such as airways, digestive tract, urinary and reproductive systems. By covering and lining these surfaces, epithelial tissue protects the body from infection, injury and dessication (drying out). Some epithelium forms glandular tissue that produce and release secretions. Examples of glandular epithelium are salivary glands (saliva), sweat glands (sweat), thyroid gland (hormones), adrenal glands (hormones), pancreas (hormones), and mammary glands (milk).
Epithelial tissues are classified by the shape of the cells and the number of layers. The three shapes are squamous (flat), cuboidal (box-shaped), and columnar (rectangular-shaped). The names of the number of layers are simple (one layer), stratified (more than one layer), and pseudostratified (appears to be multilayered but actually only consists of one layer). Refer to Figure 1.10 which illustrates the terminology for the shape and number of layers.

Figure 1.10 Epithelial tissue are classified based on the shape of the cells and the number of layers of the cells.
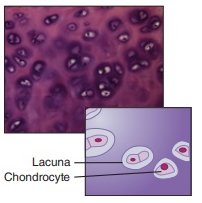
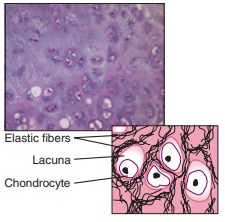
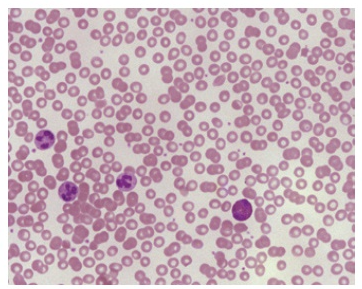
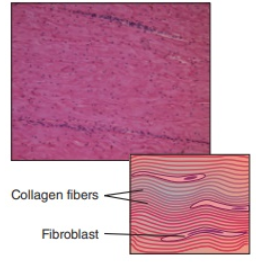
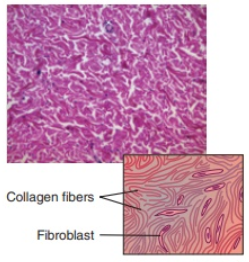
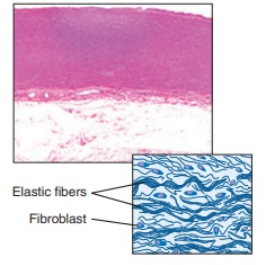
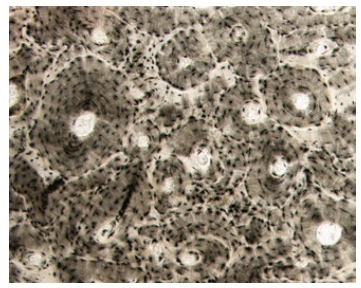
As the name suggests, one of the main functions of connective tissue is to join (or connect) different tissues and organs together. Connective tissue is classified into 3 categories based on the characteristics of their ground substance and the type of fibers found in the matrix: connective tissue proper (loose connective tissue and dense connective tissue), supportive connective tissue (bone and cartilage), and fluid connective tissue (blood and lymph) (Table 1.2).
|
Table 1.2 Comparison of Connective Tissue Types |
||
|
Connective tissue proper |
Supportive connective tissue |
Fluid connective tissue |
|
Loose connective tissue (Elastic fibers) Adipose (fat) Areolar Reticular
|
Cartilage Hyaline
Fibrocartilage
Elastic
|
Blood
|
|
Dense connective tissue (Collagen fibers) Dense regular (tendons & ligaments)
Dense irregular
Elastic
|
Bone
|
Lymph
|


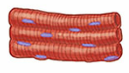
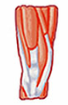
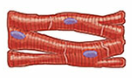
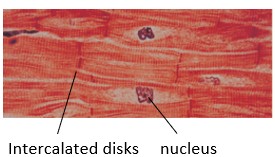
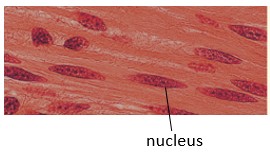
Muscle tissue is composed of cells called muscle fibers, and based on their structure, are able to contract to allow movement. Contraction of muscle fibers occurs when the muscle fibers are stimulated by nerve action potential, which triggers the muscle fibers to shorten, generating a pulling force. The body is made up of 3 types of muscle tissue: skeletal muscle tissue, cardiac muscle tissue, and smooth muscle tissue. They differ in structure, location in the body, and the mechanism of control (voluntary control versus involuntary control) (Table 1.3).
|
Table 1.3 Comparison of Muscle Tissue Types |
||
|
Skeletal Muscle |
Cardiac Muscle |
Smooth Muscle |
|
Structure: Fibers are striated no intercalated disks
Location: Attached to skeleton
Mechanism of Control: Voluntary Histology:
250x |
Structure: Fibers are striated uninucleated
Location: Heart Mechanism of Control: Involuntary Histology:
250x |
Structure: Fibers are non-striated spindle-shaped/ nonbranched no intercalated disks uninucleated
Location: Walls of internal organs and blood vessels
Mechanism of Control: Involuntary Histology:
400x |


Nervous tissue is a specialized type of tissue that is responsible for receiving, processing, and transmitting electrical signals throughout the body. It comprises the brain, spinal cord, and nerves. It monitors and regulates various functions of the body, such as sensory perception (sight, sound, touch), muscle movement, internal organ activity, body temperature, breathing, heart rate, digestion, thought processes, emotions, memory, and an overall response to stimuli from both inside and outside the body.
Two main types of nervous tissue are the neuron and the neuroglia. Neurons transmit electrical signals and form the structural and functional unit of the nervous system whereas neuroglia support, protect and nourish the neurons.
The general structure of a neuron includes dendrites, cell body, axon, and axon terminal (or synaptic knob) (Figure 1.11). The dendrites receive signals from another neuron, muscles, glands, or organs, and transmit those signals to the cell body. The cell body structure is similar to the structure of a generalized cell and contains cellular organelles, such as the nucleus, mitochondria, Golgi apparatus, and endoplasmic reticulum. The axon transmits the message from the cell body to the next target (neuron, muscle, gland, or organ) by releasing neurotransmitters from the axon terminals (or synaptic knobs) into the synapse.
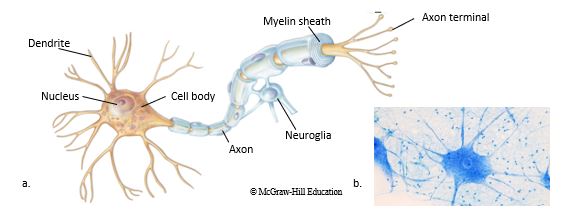
Figure 1.11: (a) The structure of a neuron. (b) Micrograph of a neuron © McGraw-Hill Education
Activity 7 Viewing Examples of Body Tissue under the Microscope
- Observe the following 6 prepared slides under the microscope at the highest total magnification of the scope (400x). Remember to reference the section How to Focus a Microscope and beginning focusing at the 4x objective and working your way up to 40x objective: epithelium (stratified squamous (skin), pseudostratified ciliated columnar), connective tissue (bone, hyaline cartilage), neuron, and skeletal muscle
- Sketch your field of view for each body tissue type on the Lab Report in the corresponding section. Label the following cellular components on each type of tissue: nucleus, cell membrane, and cytoplasm.
Activity 8: Lab Review
On the Lab Report, answer the questions in the Lab Review section.
Link to Lab Report: Lab 1 Microscopy Cellular Structure and Body Tissue Lab Report.pdf
REFERENCES
Balanant, M. A. (2019, April 20). Preparation of human Red Blood Cells for Scanning Electron Microscopy imaging. Protocols.io. https://www.protocols.io/view/preparation-of-human-red-blood-cells-for-scanning-8epv56bkng1b/v1
Barsanti, Laura and Paolo Gualtieri. (2020). Euglena gracilis-an overview. In Ozcan Konur, Ed, Handbook of Algal Science, Technology, and Medicine. Elvesier, Inc. https://doi.org/10.1016/C2018-0-02150-7
Beckman Coulter, Inc. Life Sciences. (2000-2025). Cell Types. https://www.beckman.com/resources/cell-types
Betts, J. G., Young, K. A., Wise, J. A., Johnson, E., Poe, B., Kruse, D. H., Korol, O., Johnson, J. E., Womble, M., & DeSaix, P. (2022). The Tissue Level of Organization. In Anatomy and Physiology 2e. OpenStax. https://openstax.org/books/anatomy-and-physiology-2e/pages/4-1-types-of-tissues
Briggs, G. M. (2021). Euglena: a unicellular algae. Pressbooks. https://milnepublishing.geneseo.edu/botany/chapter/euglena/
Carlson Stock Art: Life Science Illustration and More. (2025). Wet Mount Slide Technique. https://www.carlsonstockart.com/photo/slide-wet-mount-technique/
Department of Biochemistry & Molecular Biophysics University of Arizona. (1997). Studying Cells Tutorial. The Biology Project. https://biology.arizona.edu/cell_bio/tutorials/cells/cells2.html
Koenen, Anke and Dr. Michael Zölffel. (2020). Microscopy for Dummies. John Wiley & Sons.
Labster. (n.d.) Muscle tissue. https://theory.labster.com/muscle_tissue/
Learning by Questions. (n.d.) Making and Observing Microscope Slides. https://www.lbq.org/search/biology?quickref=10506
Mader, Sylvia S. (2023). Laboratory Manual for Human Biology. 17th edition. McGraw-Hill.
Scale of Universe. (2023). The Smallest Object Visible to the Naked Eye. https://scaleofuniverse.com/en/universe/smallest-object-visible-to-the-naked-eye
Sinhyu. (n.d.) Motor neuron under the microscope in lab. Shutterstock. https://www.shutterstock.com/image-photo/motor-neuron-under-microscope-lab-1851677545
Study Rankers. (2016). To prepare stained temporary mounts of human cheek cell- Lab Work. https://www.studyrankers.com/2016/06/to-prepare-stained-temporary-mounts-of-human-cheek-cell.html
Sunshine, W.Y. (2019). Red blood cells or blood smear on white background under light microscope. Shutterstock. https://www.shutterstock.com/image-photo/red-blood-cell-smear-on-white-1421837909
Therithal Info (2019-2025). Classifications of connective tissue. pharmacy180.com. https://www.pharmacy180.com/article/classifications-of-connective-tissue-3465/
