11 DNA & Biotechnology
Learning Objectives
- Describe the structure of DNA.
- Compare the structural differences between DNA and RNA.
- Identify the functions of DNA and RNA.
- Define DNA replication, transcription and translation.
- Determine the base sequence of a strand of DNA from its complementary strand (replication).
- Determine the base sequence of mRNA from its complementary strand of DNA (transcription).
- Determine the amino acid sequence encoded by a mRNA strand (translation).
- Effectively use a micropipette.
- Explain the function of restriction enzymes and their use in DNA fingerprinting.
- Perform a restriction digest.
- Explain the roles of the materials used for DNA extraction.
- Extract your own DNA from saliva/cheek cells.
- Explain the principles of gel electrophoresis.
- Perform gel electrophoresis.
- Interpret the results of DNA fingerprinting.
NUCLEIC ACIDS
Nucleic acids are one of the four major macromolecules. Nucleic acids are made up of subunits called nucleotides. A nucleotide consists of a 5-carbon sugar, phosphate group, and a nitrogenous base. Nucleotide subunits that are bound together in a chain form either DNA (deoxyribonucleic acid) or RNA (ribonucleic acid). (Figure 11.1)
(a) (b)
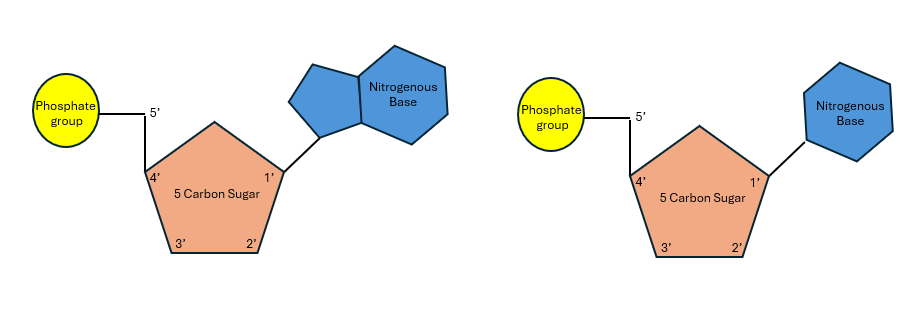
Figure 11.1: Nucleotides consist of a 5-carbon sugar, a phosphate group, and one nitrogenous base. (a) purine nucleotide and (b) pyrimidine nucleotide.
DNA
DNA, which is found in the nucleus of the cell, stores the genetic information responsible for the development and function of an organism. It is passed down from one generation to the next through fertilization. Each DNA nucleotide consists of the sugar deoxyribose, a phosphate group, and one of the following nitrogenous bases: adenine (A), guanine (G), cytosine (C), or thymine (T). Adenine and guanine are purines while thymine and cytosine are pyrimidines (see figure 11.1 above). DNA is made up of two strands of nucleotides that twist together to form a double helix. Alternating sugars and phosphate groups form the backbone of each DNA strand. The nitrogenous bases, lined up between the backbones, pair up, forming hydrogen bonds with each other. In these base pairs A is always paired with T (held together by 2 hydrogen bonds), and C is always paired with G (held together by 3 hydrogen bonds). The base pairs attach to the sugar/phosphate backbones, stacked in between the twisted backbones, like rungs on a ladder. DNA molecules from every living organism will have millions (in bacteria) or billions (in higher organisms, like humans) of base pairs, lined up along the DNA double helix structure, encoding the genetic information for that organism.

Figure 11.2: DNA is a double stranded helix with a sugar phosphate backbone. The strands are connected by weak hydrogen bonding between the complementary base pairs.
During the S phase of the cell cycle, DNA is replicated or duplicated, making an exact copy. The replication process involves the DNA strands separating, with each strand serving as a template to create new complementary strands. This results in production of two exact copies of the original parent DNA. In replication, at every adenine, a thymine is added and vice versa. At every guanine, a cytosine is added and vice versa. This follows the semiconservative model where each product of replication has one original strand and one newly synthesized strand.
Note to students: Write all data and answers to questions on the Lab Report provided.
Activity 1: DNA Replication
Replicate DNA by making a complementary strand of the DNA sequence provided. Reminder: base pairs are A-T and G-C.
|
DNA Replication |
|||||||||||||||
|
Template DNA |
T |
A |
C |
T |
A |
G |
T |
C |
C |
G |
G |
A |
A |
T |
T |
|
Complementary DNA |
|
|
|
|
|
|
|
|
|
|
|
|
|
|
|
RNA
RNA is found in both the nucleus and cytoplasm of the cell. An RNA nucleotide is made up of the sugar ribose, a phosphate group, and one of the following nitrogenous bases: adenine (A), guanine (G), cytosine (C) , and uracil (U) (U replaces T, thymine, found in DNA). RNA is a single stranded chain of nucleotides that can be from hundreds to tens of thousands of bases long. There are three main types of RNA used to build proteins: messenger RNA (mRNA), transfer RNA (tRNA), and ribosomal RNA (rRNA). (Figure 11.3) Transcription is the process of creating mRNA by copying from a DNA template in the nucleus. During this process, the RNA base adenine (A) pairs with DNA’s thymine (T), RNA’s uracil (U) pairs with DNA’s adenine (A), RNA’s guanine (G) pairs with DNA’s cytosine (C), and RNA’s cytosine (C) pairs with DNA’s guanine (G). The newly transcribed mRNA carries the genetic code for a specific protein from the nucleus to ribosomes in the cytoplasm where translation will occur. At the ribosome, the mRNA code is read guiding tRNAs to deliver the correct amino acids, which are then assembled into a protein. rRNA is another type of RNA that serves as the primary component of ribosomes and facilitates the decoding of mRNA during translation.
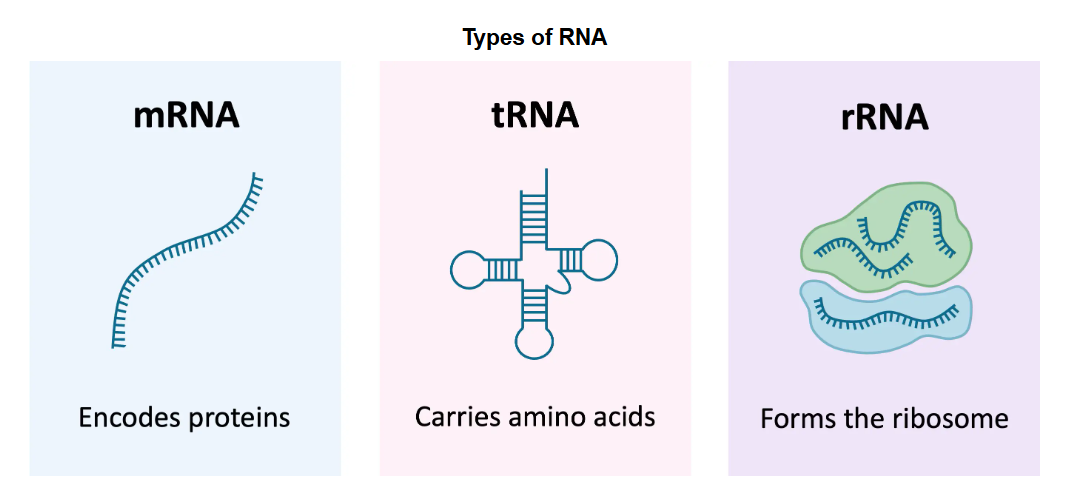
Figure 11.3: Comparison of the three main types of RNA
During translation, the sequence of bases in mRNA is read by the ribosome in groups of three nucleotides known as the codons. The four RNA bases, A, C, G and U make up 64 possible three base “triplet” codon combinations. Each codon encodes one of the 20 amino acids used by cells to build proteins. See the codon chart below and note that for most of the amino acids there are several codons that correspond. To use the codon chart, locate the first base of the codon on the left vertical edge of the table, locate the second base of the codon in the horizontal line on top, and then locate the third base within that corresponding box to determine the amino acid. (Figure 11.4)
Figure 11.4: To deduce which amino acid is coded by mRNA, examine the codon: first base = row; second base = column; third base = row within row
Activity 2: Decoding Transcription and Translation
Transcribe the DNA template into messenger RNA. Reminder: base pairs are as A-U and G-C.
|
Transcription |
|||||||||||||||
|
Template DNA |
T |
A |
C |
T |
A |
G |
T |
C |
C |
G |
G |
A |
A |
T |
T |
|
messenger RNA |
|
|
|
|
|
|
|
|
|
|
|
|
|
|
|
Translate the messenger RNA from Part A into an amino acid chain. When copying the mRNA from Part A, be sure to group the bases into codons (triplets). Use the codon chart provided above in Fig. 11, and on the Lab Report.
|
Translation |
|||||
|
messenger RNA |
|
|
|
|
|
|
Amino acid chain |
|
|
|
|
|
BIOTECHNOLOGY
Biotechnology is the application of biological tools and principles to solve problems and create useful products or processes within medicine, agriculture, and industry. It involves manipulating living organisms or their components, such as DNA, RNA, or enzymes. This lab will introduce and carry out one application of biotechnology: DNA fingerprinting. DNA fingerprinting identifies individuals by comparing their unique DNA fingerprints, or profiles. It is often used in forensic science to match suspect DNA to crime scene DNA and in paternity testing to match a child’s DNA to the father’s DNA.
DNA fingerprinting entails several biotechnology techniques, such as using polymerase chain reaction, restriction enzymes, and gel electrophoresis. Polymerase chain reaction, which will not be carried out in this course, increases the number of copies of a trace or small amount of DNA to enable scientists or clinicians sufficient quantities for analysis. Restriction enzymes act as molecular scissors to cut DNA at specific sequences of base pairs along a DNA strand. These specific sequences are called restriction sites. Restriction enzymes may cut at more than one location if there are multiple restriction sites on one DNA strand, resulting in multiple fragments, and the unique pattern of pieces of DNA is used to generate a “fingerprint”. (Figure 11.5)

Figure 11.5: The scissor icons represent where DNA is cut by the restriction enzyme EcoRI. The restriction site is the base sequence GAATTC.
After this restriction digest is carried out, the DNA fragments are separated by size through gel electrophoresis. DNA fragments are loaded into an agarose gel (similar to a slab of gelatin consistency). inside a gel chamber. A conductive buffer solution is added. The gel chamber has negative and positive electrodes, and an electrical current is run through the buffer and the gel. Since DNA fragments are negatively charged, they will be drawn toward the positive electrode with smaller DNA fragments traveling the furthest through the gel. Larger DNA fragments lag behind and end up closer to the negative electrode. In the electrical field the DNA fragments will spread out in size order and appear as bands on the gel after staining. (Figure 11.6)
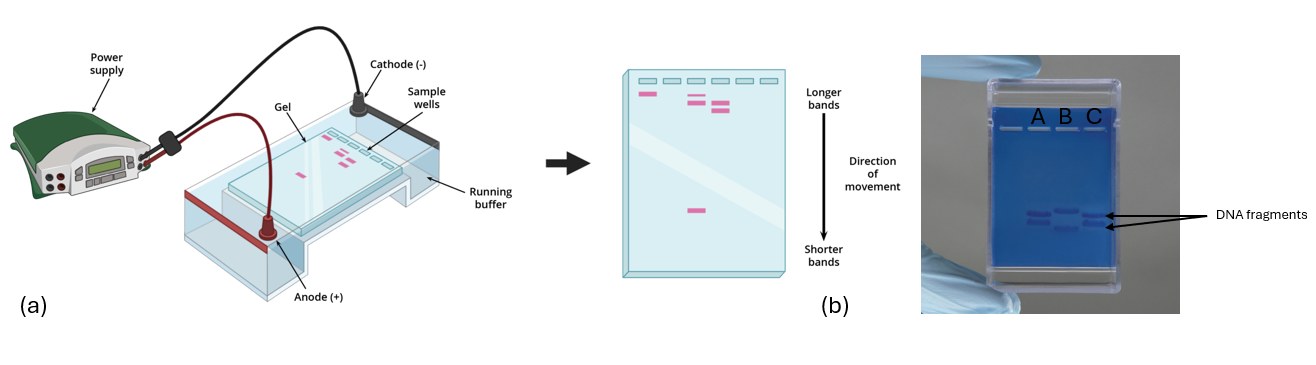
Figure 11.6: (a) The gel chamber is connected to a power supply to provide the electricity that travels from the negative electrode (cathode) to the positive electrode (anode), which allows the movement of DNA fragments. Smaller DNA fragments form bands that travel further than larger DNA fragment bands. (b) On the right is an example of a stained gel where Lane A and Lane C have matching DNA fingerprints.
Even though human DNA is 99.9% identical across human populations, in individuals the remaining 0.1% contains variations that are unique to each person, forming a unique DNA fingerprint. By comparing the DNA bands on a gel, identification can be made.
HOW TO USE A PIPETTE
To carry out different biotechnology techniques, small volumes of liquid need to be accurately measured, using a device called a pipette. A pipette can measure smaller or larger volumes, ranging from microliters (µL) to milliliters (mL). Pipettes have different capacities, such as 1 mL, 5 mL, 10 mL or 25 mL. Micropipettes measure even smaller volumes in units called microliters (µL). There are 1,000 microliters in one milliliter (1000 µL = 1 mL). A P20 micropipette measures volumes between 1 µL and 20 µL. A P200 micropipette measures volumes between 20 µL and 200 µL. A P1000 measures between 200 µL and 1000 µL. To measure different volumes of different liquids with a micropipette, use a fresh disposable tip attached to the tip holder for each sample. The disposable tip is what holds the liquid sample. (Figure 11.7)
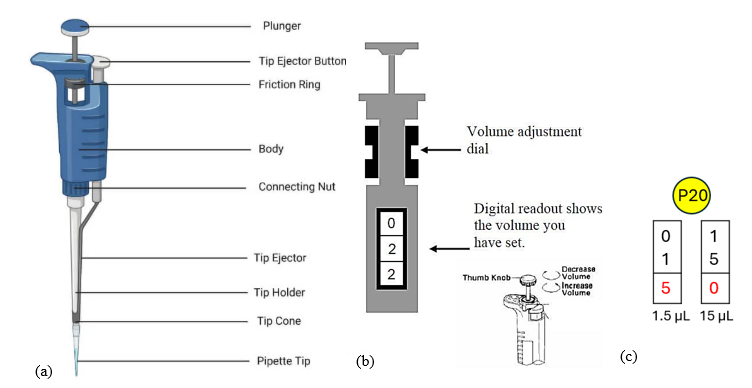
Figure 11.7: (a) Labeled micropipette, (b) how to adjust the volume of a micropipette, (c) how to measure 1.5 µL versus 15 µL on a P20 micropipette. The red digit represents tenths of a microliter (the digit that comes after the decimal point).
Activity 3: Practice using a Micropipette
Before beginning the DNA fingerprinting experiment, we need to practice how to use a micropipette so that the correct volumes are measured. A P20 micropipette, disposable tips, microcentrifuge tubes, and blue colored water are available to practice pipetting.
- Use the volume adjustment dial to set the volume to 15 µL (see Figure 11.7c).
- Grasp the body of the micropipette in your dominant hand with your four fingers and your thumb above the plunger.
- Insert the tip holder into a pipette tip within the tip box to load a fresh tip onto the micropipette.
- Gently press the plunger to the FIRST STOP.
- With the plunger depressed, place the pipette tip into the tube of blue colored water.
- With the pipette tip still submerged, slowly release the plunger to draw up the blue colored water. Check the tip – is there liquid there? Are there any bubbles?
- Place the pipette tip into an empty microcentrifuge tube and completely depress the plunger until it stops at the second point to empty the liquid in the tip into the microcentrifuge tube.
- Close the cap of the microcentrifuge tube.
- Eject the used tip into the small biohazard bag on the lab bench, by pressing the ejector button to remove the used pipette tip.
- Now use the volume adjustment dial to set the volume to 1.5 µL. You can practice transferring a smaller volume by depositing a tiny drop of liquid onto a sheet of paper, and repeating this ten times, making a line of small droplets of even consistency. Compare the droplets to make sure your pipetting is consistent.
- Repeat Steps 2-9 transferring the much smaller volume into a new microcentrifuge tube. Hold the two microcentrifuge tubes next to each other to compare the difference of volume pipetted. Record observations on the Lab Report.
- Dispose of the used microcentrifuge tubes into the small biohazard bag on the lab bench.
- Steps 1-13 may be repeated by each group member.
DNA FINGERPRINTING EXPERIMENT
Activity 4: Performing a Restriction Digest
This experiment will be carried out by 3 groups per lab class. The goal is to identify which of five suspects’ DNA matches the crime scene DNA, helping the authorities to solve the crime.
Several items have been prepared ahead of lab:
- Each DNA sample will be provided for you as a DNA solution in sterile water. You will be provided with the following samples in microtubes in a small microtube rack:
Tube Color
Sample Volume
DNA Sample
Abbreviation
Green tube
20 µL
Crime Scene DNA
CS
Blue tube
20 µL
Suspect 1 DNA
S1
Orange tube
20 µL
Suspect 2 DNA
S2
Purple tube
20 µL
Suspect 3 DNA
S3
Pink tube
20 µL
Suspect 4 DNA
S4
Yellow tube
20 µL
Suspect 5 DNA
S5
- Restriction Enzymes EcoR1/Pst1 (a small tube labeled ENZ) have been prepared for you by dissolving them in sterile water. That tube will be found in the ice bucket.
- Loading dye is provided for you in the microtube rack along with the DNA samples. It is labeled LD.
- DNA size marker mixture will be provided for you in the tube labeled M (marker plus loading dye) in the microtube rack.
- The water bath will be preset to 37˚C.
Prepare samples for Restriction Digest (per group):
- Using a fresh pipette tip for each DNA sample tube, add 2 µL restriction enzymes (ENZ) to each of the tubes labeled, CS, S1, S2, S3, S4 and S5 . Gently pipet up and down to mix the DNA with the restriction enzymes. Make sure all the liquid is ejected into the tube (and no longer in the tip).
- Discard the tip after each addition.
- Firmly close each colored microcentrifuge tube. Spin the 6 tubes for 15 seconds in the microcentrifuge to bring all the liquid to the bottom of the tubes.
- Incubate the 6 colored tubes for 1 hour in the 37˚C water bath to allow the restriction enzymes to digest the DNA samples. Be sure to mark each groups’ samples in the rack within the water bath.
- After the digestion is complete, using a fresh pipette tip for each tube, add 3 µL of DNA sample loading dye (LD) to each of the 6 tubes and mix by pipetting up and down.
- Label the microcentrifuge rack with a group name.
- Store the 7 tubes (6 colored tubes of DNA samples plus one clear tube of Marker (M) in the labeled microcentrifuge rack and place in the refrigerator.
 These DNA samples will be used in the next part of the lab, next week, for fingerprinting analysis by gel electrophoresis .
DNA EXTRACTION
**This experiment is not part of the Fingerprinting experiment, but it will be performed during the one-hour incubation period of the restriction digest.
DNA extraction is the process of isolating DNA from cells in a biological sample, such as saliva or blood. DNA cannot be seen with the naked eye, but it can become visible when separated from other cellular components and in larger concentrations. In this experiment, you will collect cheek epithelium, that is skin cells from the inside of your mouth, break open the cells, and release the DNA into a test tube.
- How DNA extraction occurs in this experiment:
- Human saliva contains cells from the insides of the cheek and other mouth surfaces. You can collect some of these cells by spitting into a test tube. Dish detergent breaks open the cells by disrupting cell membranes, releasing the contents of cells into the saliva solution. These contents include proteins, sugars, DNA, and RNA.
- The contact lens cleaning solution contains protease (an enzyme that degrades protein). A few drops of this cleaning solution should decrease the amount of protein that precipitates out with your DNA.
- The salt helps aggregate and clump DNA molecules together due to the positively charged ions in the salt and the negative charge of DNA.
DNA is not soluble in alcohol, so when alcohol is added it forms a clump of stringy visible DNA where the alcohol and saltwater layers meet. It will appear as white, cloudy clumps, containing thousands of DNA molecules grouped together. The white stringy clumps contain your own cell DNA strands!
Activity 5: Protocol to Extract Your Own DNA
- Spit into a tube repeatedly until you collect about 1 ml of saliva.
- Add 2 drops of dish detergent to the tube of saliva.
- Add 3 drops of contact lens cleaning solution to the tube.
- Add a pinch of table salt to the soapy saliva.
- Cap the tube and mix the solution in the tube for one minute by gently flicking or inverting the tube.
- Transfer the salted soapy saliva into a larger tube.
- Slowly add 5-6 mL of ethanol to the tube and then cap it.
- Gently invert the tube to mix. Do not shake the tube!
- Let the tube sit for 5 minutes.
- Record your observations and answer the following questions on the Lab Report.
a. What is DNA? Where is it found?
b. In the DNA extraction exercise what material causes DNA to be released from a cell?
c. If DNA is so small that it fits into one cell, how are we able to see it with our naked eyes after extraction? How does it appear?
GEL ELECTROPHORESIS
This is a continuation of the DNA fingerprinting experiment that was started last week. See above, Activity 4, step 7, marked by the “Stop Sign”.
**To be performed during the second week of the experiment.
Activity 6: Gel Electrophoresis
Several items have been prepared ahead of the lab:
- Agarose gels have been pre-made in the form of a rectangular slab with 8 wells. One gel slab is placed in each gel chamber with the wells facing the left side, closest to the negative electrode (black) end of the chamber.
- 1x TAE buffer has been prepared for you. It is added to the gel chamber to cover the agarose gel.
- 100X Fast Blast stain has been prepared for you to stain the gel after the electrophoresis is complete. It is available on each student group’s lab bench. The bottle has been placed inside a plastic gel staining tray.
Load a Gel with DNA samples:
- Retrieve the rack from the refrigerator containing your DNA samples from last week.
- Centrifuge the tubes in the microcentrifuge for 15 seconds. Make sure the microcentrifuge is balanced. That is, tubes are placed opposite each other in the centrifuge). This brief centrifugation brings the contents of the tubes to the bottom of the tube through centrifugal force.
- Using a fresh pipette tip, load 15 µL of the DNA size marker (M) from the clear tube into the first well, Lane 1 of the agarose gel.Note: Wells are read from left to right. The first sample should be loaded in the well closest to you, (When the wells are on the left side of the chamber they are numbered from closest to you to furthest from you, as illustrated below. Note that in the gels we are using there are a total of 8 wells.).

- Then using a fresh pipette tip for each DNA sample, load 15 µL of each DNA sample into the gel in the following order. Do this in rapid succession as the samples will start to diffuse once they are in the gel. Please note there will be extra contents, a small amount of liquid, remaining in each tube.
Tube Color
Sample Volume
DNA Sample
Abbreviation
Lane #
Green tube
15 µL
Crime Scene DNA
CS
2
Blue tube
15 µL
Suspect 1 DNA
S1
3
Orange tube
15 µL
Suspect 2 DNA
S2
4
Purple tube
15 µL
Suspect 3 DNA
S3
5
Pink tube
15 µL
Suspect 4 DNA
S4
6
Yellow tube
15 µL
Suspect 5 DNA
S5
7
- Secure the lid of the gel chamber. The lid will attach to the base in only one orientation: red leads to red electrodes and black leads to black electrodes.
- The electrical leads should already be attached to the power supply.
- Turn on the power supply and set it to 100 V and run the electrophoresis for 40 minutes.
- When the electrophoresis is completed, turn off the power supply and remove the lid from gel chamber.
- Put on protective gloves as the stain will color your skin blue. Carefully remove the gel tray with the gel from the gel chamber and slide the gel off the gel tray into the plastic staining tray.
- Add the contents of the bottle labeled “100x Fast Blast” into the plastic staining tray, completely covering the gel with the stain.
Note: Fast Blast DNA Stain is non-toxic but it will stain skin. WEAR GLOVES. - Stain the gel for 2 minutes.
- Pour the Fast Blast stain back into the original bottle and close the cap.
- Add warm tap water to the plastic staining tray and rinse the gel for approximately 10 seconds. Be sure to gently hold the gel with your gloved hand, so it does not slip into the sink.
- Pour the stained water down the sink drain, holding the gel down in the tray gently with your gloved fingers.
- Continue to destain by adding more warm tap water into the plastic staining tray. Place the tray onto the platform shaker and gently shake for 5 minutes.
- Repeat steps 14-15 to wash the gel in fresh water again for 5 minutes.
- View the stained gel on the light box. Note: To better view the gel, the instructor may use the overhead projector as a light source.
- Record results: You may take a picture of the gel.
Which suspect DNA fingerprint matches the fingerprint pattern of the Crime Scene DNA?
19. Answer the following questions on the Lab Report:
a. What caused the DNA to become fragmented?
b. What determines where a restriction enzyme will cut a DNA molecule?
c. What would be a logical explanation as to why there is more than one band of DNA for each of the samples?
Activity 7: Lab Review
On the Lab Report, answer the questions in the Lab Review section.
Link to Lab Report: Lab 11 DNA Biology & Technology Lab Report
REFERENCES
Betts, J. G., Young, K. A., Wise, J. A., Johnson, E., Poe, B., Kruse, D. H., Korol, O., Johnson, J. E., Womble, M., & DeSaix, P. (2022a, April 20). 3.4 Protein Synthesis – Anatomy and Physiology 2E | OpenStax. https://openstax.org/books/anatomy-and-physiology-2e/pages/3-4-protein-synthesis
BioNinja. (n.d.). Types of RNA. https://ib.bioninja.com.au/types-of-rna/
Bio-Rad Explorer Team, Poli, L., Janigian, R., & Skinner, P. (2000). Bio-Rad Explorer Forensic DNA Fingerprinting Kit Instruction Manual. In Bio-Rad Explorer [Instruction Manual]. Bio-Rad Life Science Group. https://explorer.bio-rad.com
Bush, Patricia. (2025). Codon Chart gif. Wayne, NJ: William Paterson University.
Carolina Biological Supply. (n.d.) Exploring electrophoresis using forensic DNA Evidence demonstration kit. https://www.carolina.com/dna-extraction-quantification/exploring-electrophoresis-using-forensic-dna-evidence-demonstration-kit/211033.pr
Karki, P. (2024, December 25). Guide to Pipettes: Principle, Types & Key Uses. Microbe Notes. https://microbenotes.com/pipette-principle-parts-types-procedure-uses-examples/
Mader, Sylvia S. (2023). Laboratory Manual for Human Biology. 17th edition. McGraw-Hill.
NC DNA Day. (2011). 5-Minute DNA Extraction. http://ncdnaday.org/ondemand/wp-content/uploads/201/08/5-minute-DNA-Extraction.pdf.
PBS: NOVA. (2012). Extract Your Own DNA. http://www.planet-science.com/categories/experiments/biology/2012/03/extract-your-own-dna.aspx.
Stratech. (n.d.). Gel Electrophoresis – Stratech. https://www.stratech.co.uk/aat-bioquest/gel-electrophoresis/
Team, B. (2024, May 14). How to use a micropipette? – Biology Notes online. Biologynotesonline.com. https://biologynotesonline.com/how-to-use-a-micropipette/
Ttsz. (2022, January 21). DNA structure. Base pairing and nucleotide. Cytosine, Thymine,. . . iStock. https://www.istockphoto.com/vector/dna-structure-base-pairing-and-nucleotide-gm1365914122-436623717?searchscope=image%2Cfilm
Washington University School of Medicine (n.d.) DNA Extraction: Teacher Handout. http://ysp.wustl.edu/KitCurriculum/DNAExtraction/DNA%20Extraction-Teachers.pdf
